Building a simple Web Application in .NET Framework 4.6x and C#
As we all know, .NET is the widely used cross-platform and open-source developer platform for building web/mobile/desktop/games/IoT/AI/ML apps. As it evolved throughout the past few decades and present, it has mainly 3 flavors – Standard, Framework and Core. Out of these, majority of the apps are built using Framework flavor (4.x) and recent ones are built or are recommended to be built in .NETCore platform. The future is set on one single flavor which will be .NETCore, specifically, the descendants of .NETCore 5.0. .NETCore 5.0 stable release is expected to be released towards the end of year 2020.
This article is a quick and handy reference to assist you with how to build a simple MVC based web application in the recent generation of .NET Framework 4.x (a separate one is forthcoming using .NETCore 3.1). With not much bells and whistles, this is a simple guide to help the beginner to get started. This tutorial assumes that you have some working knowledge of C# programming language, Linq and razor. If not, make sure you get some training on that.
Step 1: Create Project in Visual Studio (VS 2019 recomjmended)
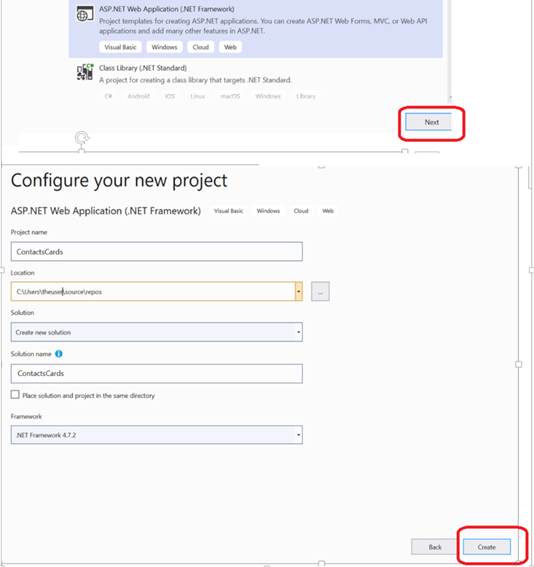
As shown below, Create New Project from the menu, select ASP.NET Web Application (.NET Framework), click ‘Next’. Then give appropriate project name and click ‘Create’.
Next, as shown below, select MVC as the template for the ASP.NET web application.
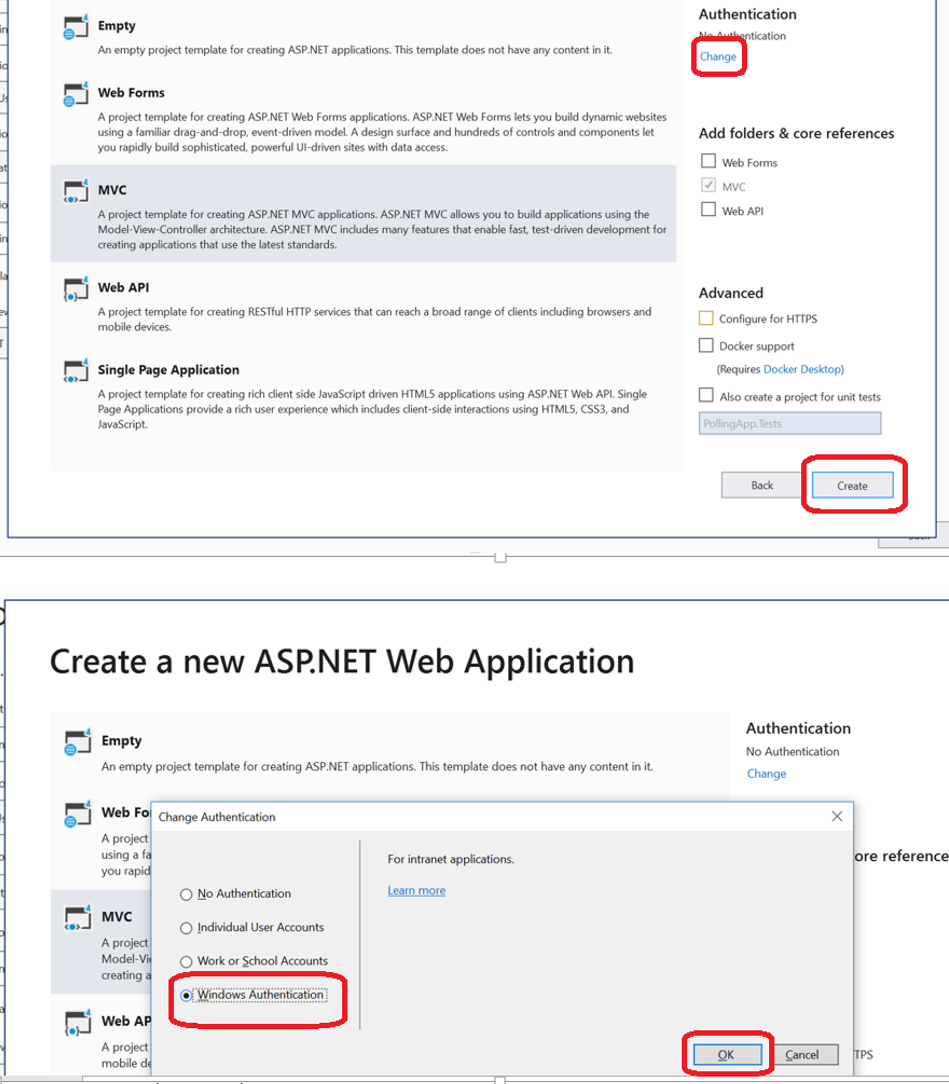
Now focus on the top right corner for Authentication. Click on ‘Change’. It will present a dialog box with 4 distinct options for you to choose from depending on the needs of your application. Many times, you would need a user registration and account management feature built into your application. In that case, you would choose the second option that says ‘Individual User Accounts’. In doing so, you would be installing .NET UserIdentity and Entity Framework to manage the user accounts registration and management. The cool thing is that it automatically installs Entity Framework for you since UserIdentity needs it anyway. Now, if your app. need to use windows authentication (as inside an intranet), then choose the last option that says ‘Windows Authentication’. Remember, using this option, you will have to deal with user management and you will have to install and configure Entity Framework by yourself if you need to. In our example, we will use the 4th option to set a scenario where you would be using this app. with an admin module used within an intranet and part of it exposed outside. This will also help those who want to know how to install Entity Framework and link it to the project.
Step 2: Initial Project Setup and about the web application
For purposes of this tutorial, we will be building a simple Contact Card application that allows the user to manage contacts.
User Story: The application will allow user to add, edit and delete contacts and allows user to view a list of available contacts so that he/she could effectively manage his contacts.
Acceptance Criteria: Should have basic validations on the Add/Edit forms. The system should only be accessible to authorized users within an intranet over LDAP account and the contact list view should be pluggable to outside world for general public view.
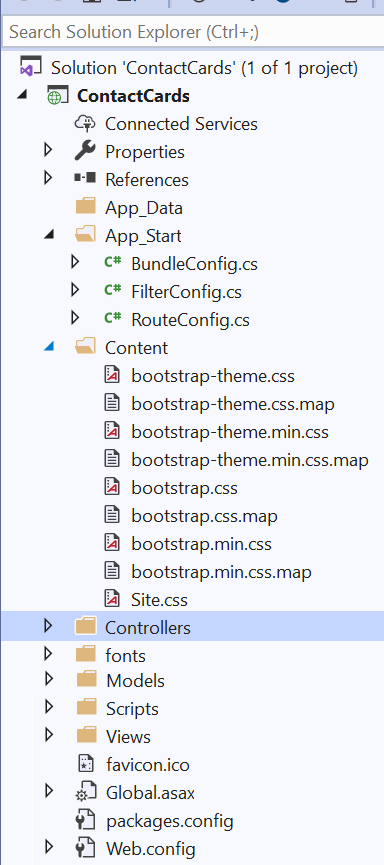
Basic Project Setups: As you can see VS creates the basic MVC structure for you as shown below. Note: This is refined in .NETCore and is slightly different to match the general open source systems.
For experienced developer above structure is self-explanatory. For beginners, I will try to briefly explain what it means –
Global.asax file is basically the ASP.NET application file which allows us to code various events before/on/after/close of application, all from a central location that affects the whole application.
Web.config is basically the configuration file for your ASP.NET application. For example, it is where you define the connection strings for your DB.
References shows all the external packages installed within your project. If you expand and see, you will notice that EntityFramework package is missing since we choose Windows Authentication (as mentioned in a section above).
App_Start contains your config files for Bundling (https://docs.microsoft.com/en-us/aspnet/mvc/overview/performance/bundling-and-minification ), Filtering (if you want to define custom filters that gets acted upon before a request reaches your controller method) and Routing (where you will define your custom routes to the application)
Models holds all your application DB Models
Views holds all the views for your application
Controllers holds all your application controllers
Scripts holds your javascipt/jquery stuff
Content holds the css and core site css files. VS includes the latest bootstrap version based on the VS version. You can override this by copying your own taste of bootstrap themes or latest bootstrap version downloaded from (https://getbootstrap.com/docs/4.5/getting-started/download/). As of this writing, the latest version is 4.5.2.
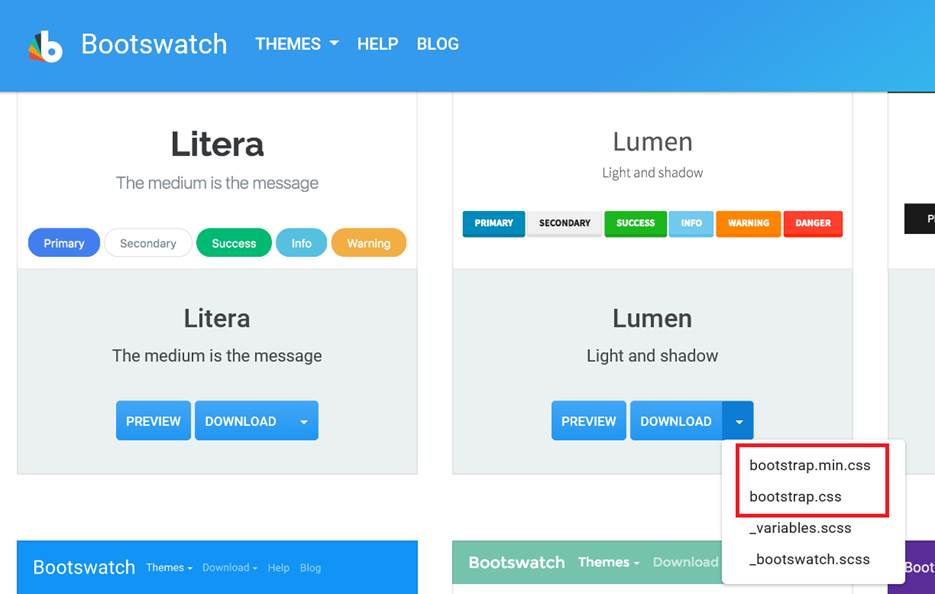
For example, if you want to use custom themes for your CSS, there is a useful site for it – www.bootswatch.com. I like Lumen theme as it provides the latest web app. facelift for your entire site. So download both min and normal css files as shown below and store it under ‘Content’ folder (take backup of original bootstrap css files in case you need it).
Step 3: Create Models (First!) via Code First approach
Code First with Entity Framework is the most recommended approach to cleanly design, build and maintain an ASP.NET web application. This statement is from my personal experience and from the collective recommendation and experience from the industry. Basically, this allows you to think and define your entities first via a logical model design. Then wire it up to Entity Framework layer and use Migrations feature to automatically document and version the DB creation and subsequent DDL updates. By doing this, you can easily apply and revert a particular version of your DB structure from a point of time onto any desired environment at any time. What this means is you don’t have to worry about managing your DB creation scripts and its versioning and the related headaches of applying it to a specific environment while you move your application across various environments. Ok, now let’s get our hands dirty looking at how we do this and create our first cut of Contacts Cards database.
Create ContactCard.cs
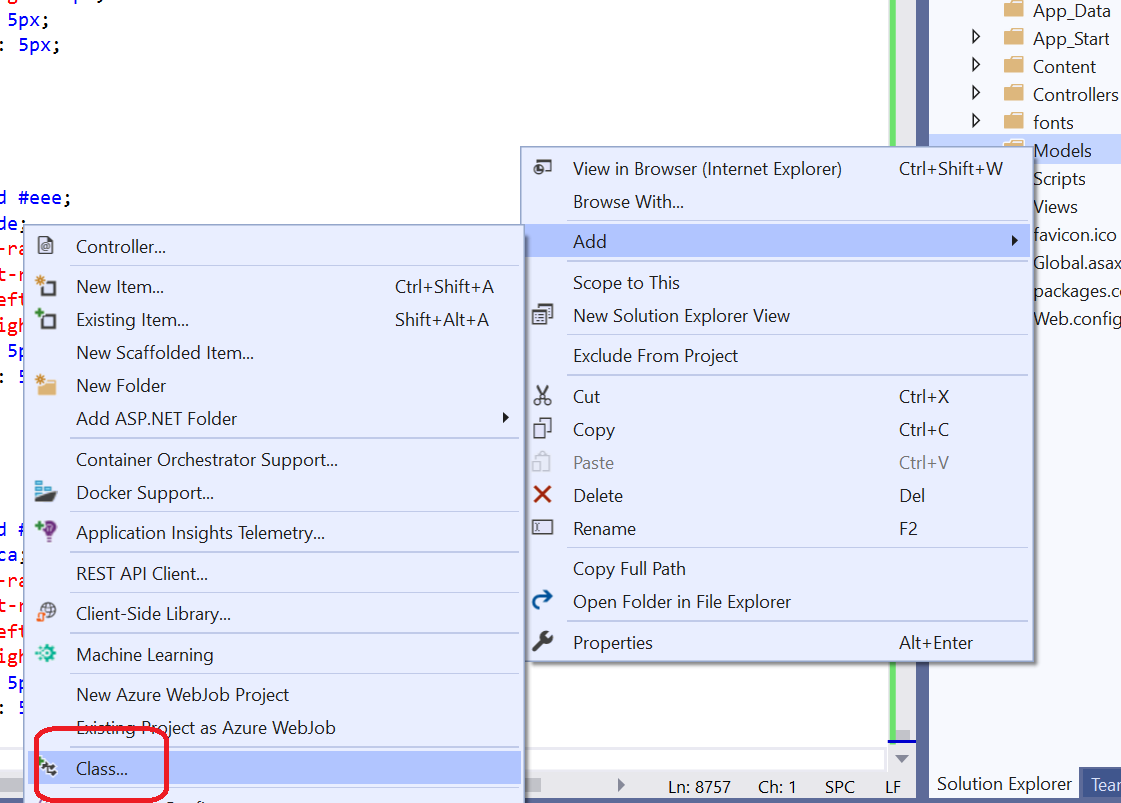
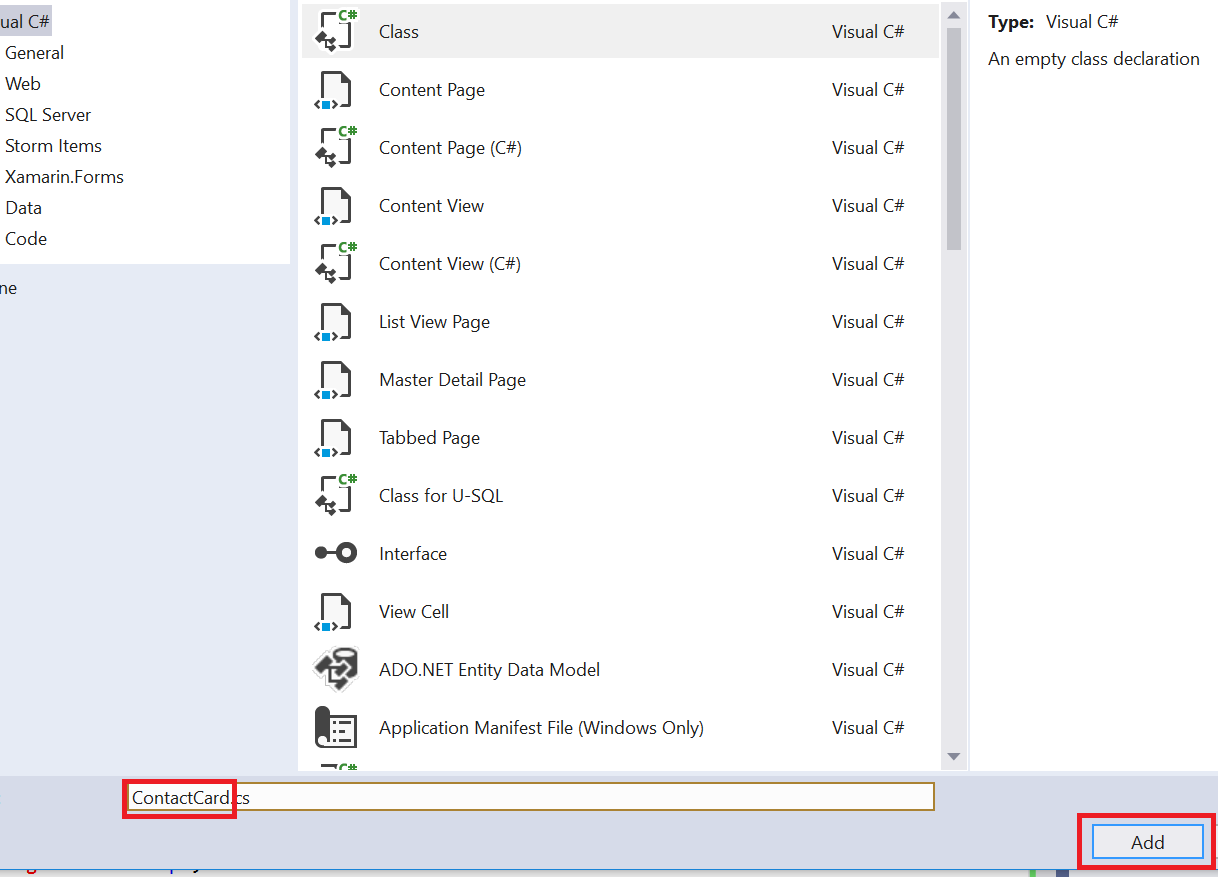
So the first step is to create the Model Class. As shown below, create new class under the ‘Models’ folder –
Name the class file as ContactCard.cs and click ‘Add’. You will see the new class file created under the ‘Models’ folder.
Create C# Model Class step2
By this time, you should have done your homework on identifying what information you need to manage within your Contact entity viz. Name, Email, Phone etc. You define this information as properties within the Model class as below –
using System.ComponentModel;
using System.ComponentModel.DataAnnotations;

namespace ContactCards.Models
{
    public class ContactCard
    {
        public int Id { get; set; }

        [DisplayName("First Name")]
        [StringLength(50)]
        public string FirstName { get; set; }

        [DisplayName("Last Name")]
        [StringLength(50)]
        public string LastName { get; set; }

        [DisplayName("Middle Initial")]
        [StringLength(1)]
        public string MiddleInitial { get; set; }

        [DisplayName("Email")]
        [Required(ErrorMessage = "The email address is required")]
        [EmailAddress(ErrorMessage = "Invalid Email Address")]
        public string Email { get; set; }

        [DisplayName("Phone")]
        [Required(ErrorMessage = "The Phone is required")]
        public string Phone { get; set; }

        [DisplayName("Address")]
        [Required(ErrorMessage = "The Address is required")]
        public string Address1 { get; set; }

        [DisplayName("Address 2")]
        public string Address2 { get; set; }

        [DisplayName("City")]
        [Required(ErrorMessage = "The City is required")]
        public string City { get; set; }

        [DisplayName("State")]
        [Required(ErrorMessage = "The State is required")]
        [StringLength(2)]
        public string State { get; set; }

        [DisplayName("Zip Code")]
        [Required(ErrorMessage = "The Zip Code is Required")]
        [RegularExpression(@"^\d{5}(-\d{4})?$", ErrorMessage = "Invalid Zip")]
        public string Zipcode { get; set; }
    }
}
Highlights of the Model class – As you can see, we have removed unnecessary include from the top and just retained the ones that we really use. Also, we have decorated Model properties with DataAnnotation and thus included the required directives on top. We have used at least 5 DataAnnotation attributes such as DisplayName, Required, StringLength etc. If you are interested, look them up to learn more. For eg: see how handy is to use DataAnnotation for Email and Regular expression check for Zipcode which will save a lot of coding at front end across the application.
Kick Off Migration and cut the first version of Database!
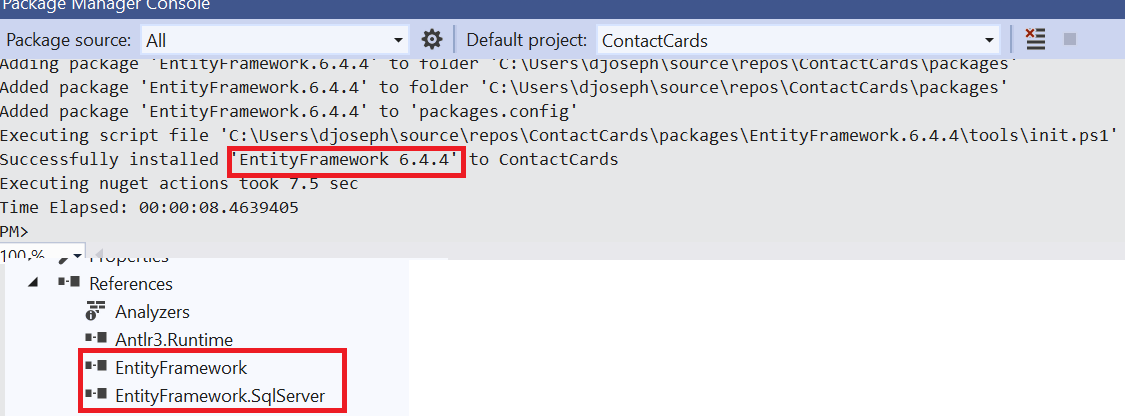
Ok, now it’s time to use Entity Framework to create our first cut of Database using Migrations. As mentioned in an above section, since we opted to use Windows Authentication, we don’t have Entity Framework installed by default. So we will use Nuget Package manager to install it and we will go from there as shown below –
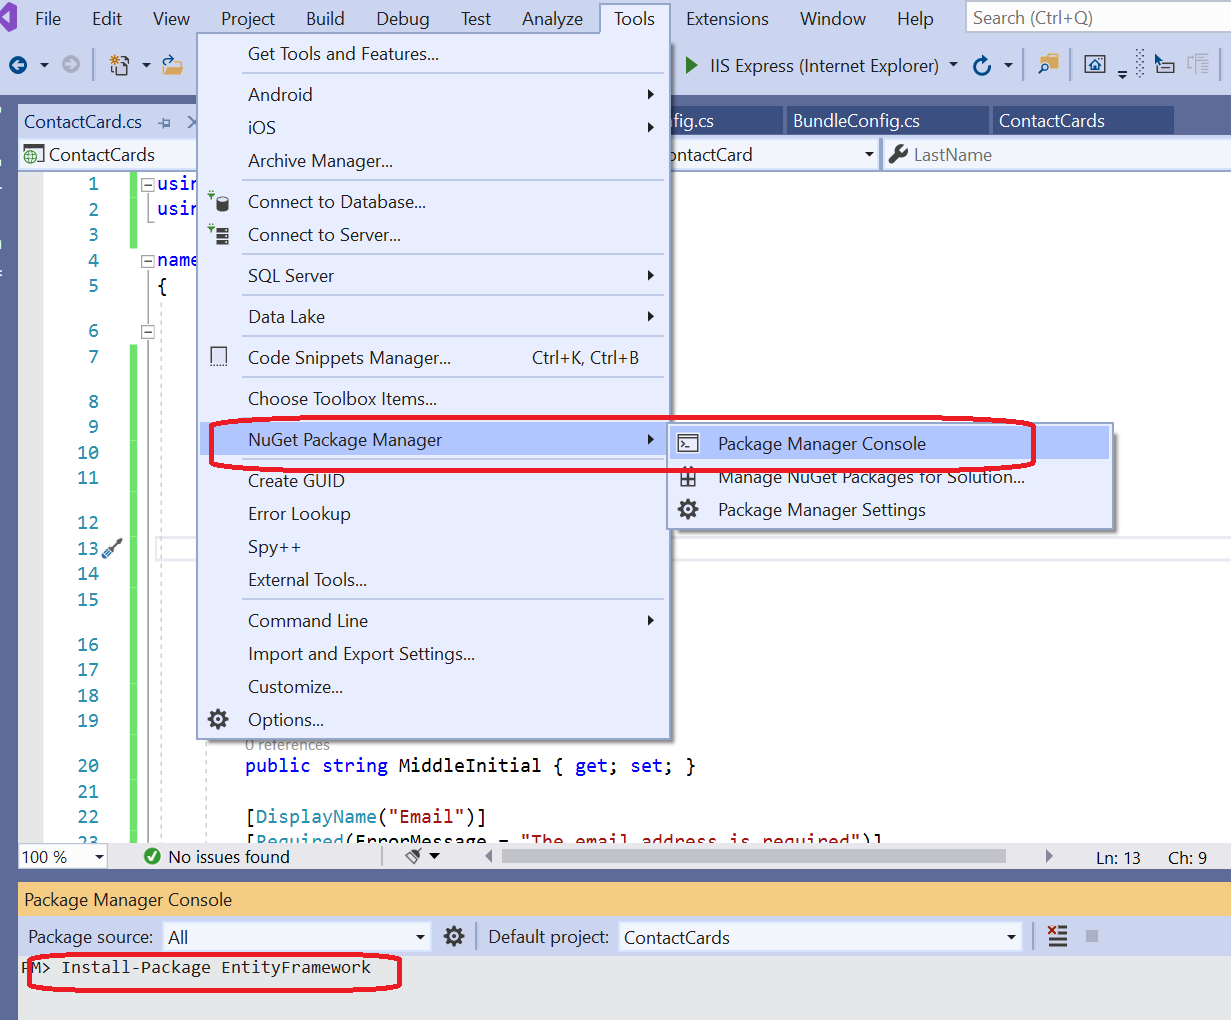
After successful installation, you should see the below two packages under your project references.
Once Entity Framework is installed, you can now go ahead and create your Physical Database. First step is to create a DBContext file that defines the Dbsets which links EntityFramework Dbsets to the actual physical database. So, create a class ContactCardContext.cs (you can call it anything, but standard practice is to call it something related to the core DB with the word ‘Context’ attached to it) under the Model folder and add below code to define the DBset –
using System.Data.Entity;

namespace ContactCards.Models
{
    public class ContactCardContext : DbContext
    {
        public ContactCardContext()
        {
        }
        public virtual DbSet<ContactCard> ContactCards { get; set; }
    }
}
As you see above, our custom DbContext file derives from the DbContext class that hooks on to the core ObjectContext class via IObjectContextAdapter.
Now, once we have the DbContext defined, the next step is to go ahead and create the physical database. This process is called ‘Migrations’ where you will kick start your DB versioning and your physical DB creation or update process. In order to do this, you will enable Migrations for your project, add a migration point and then perform DB update as shown below –
Enable migrations –
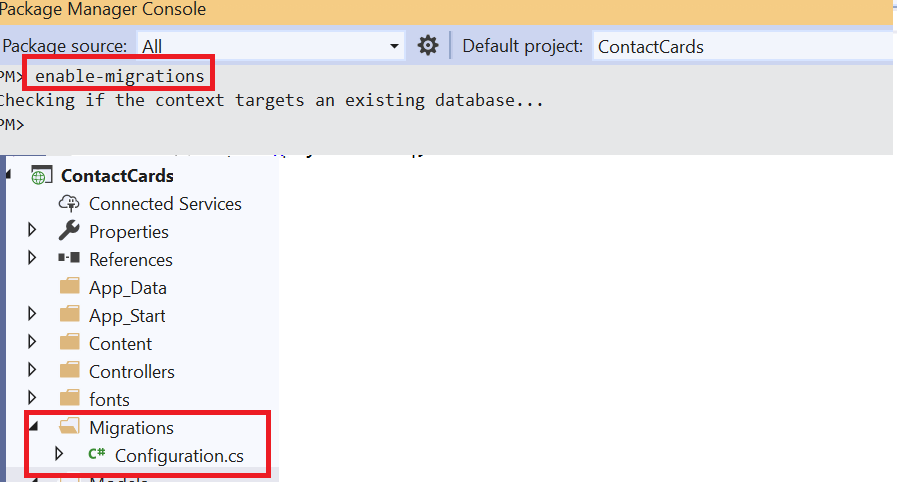
As shown, use command ‘enable-migrations’ on Nuget package manager (PM) console and on successful completion, it should show the new folder ‘Migrations’ with the related config file.
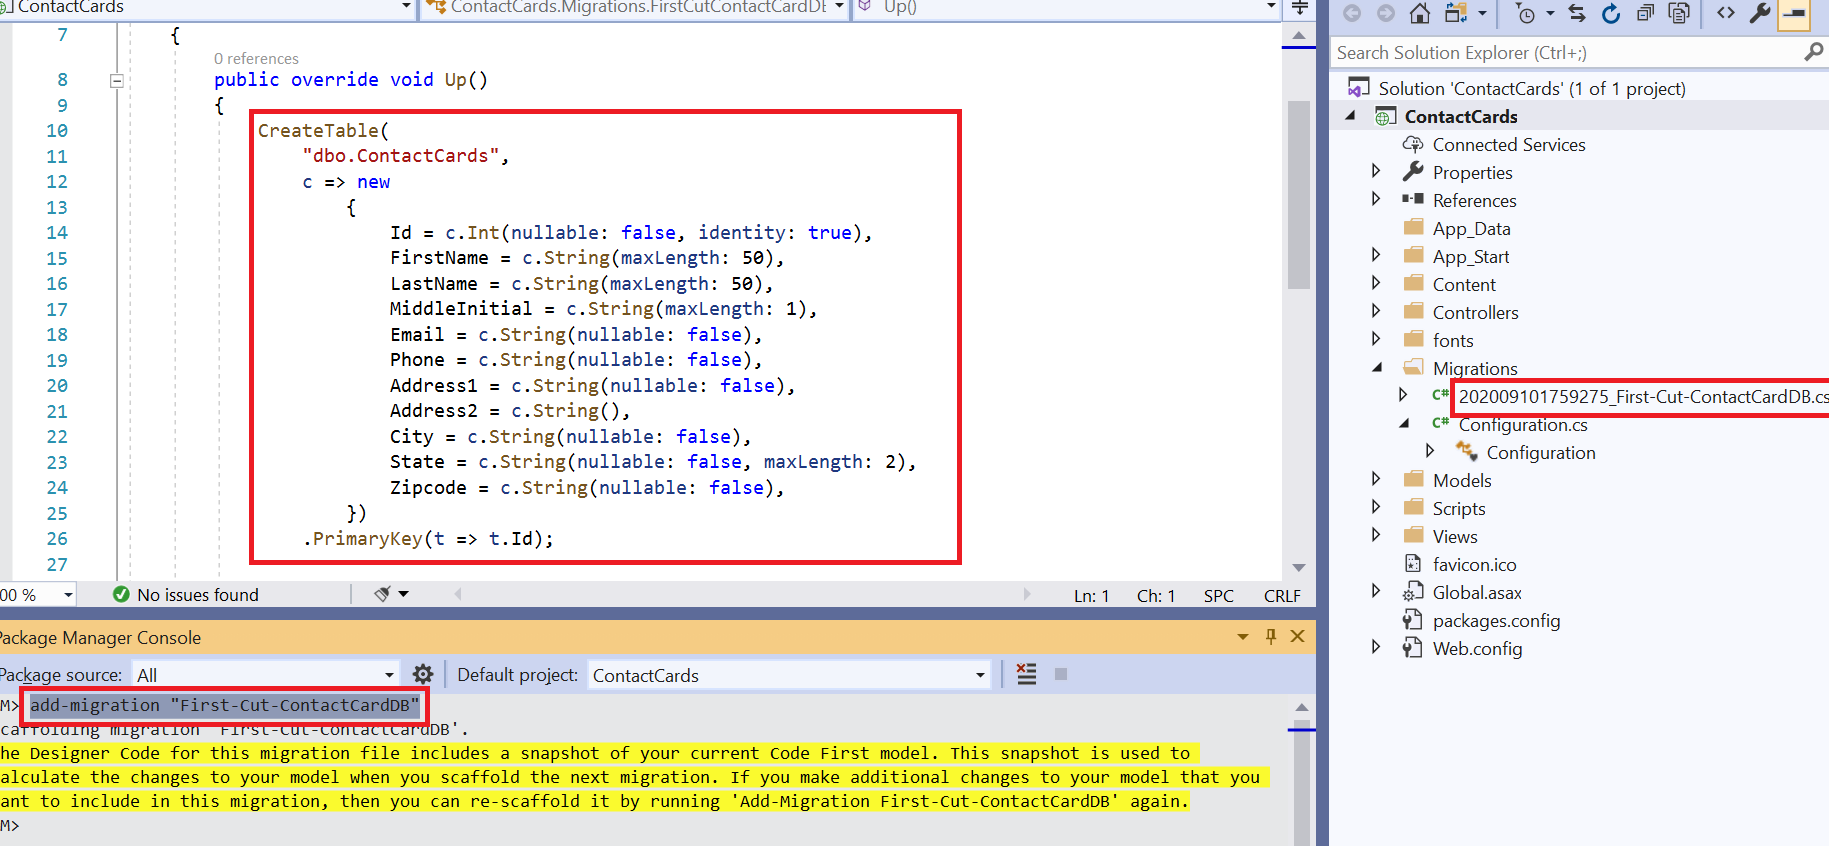
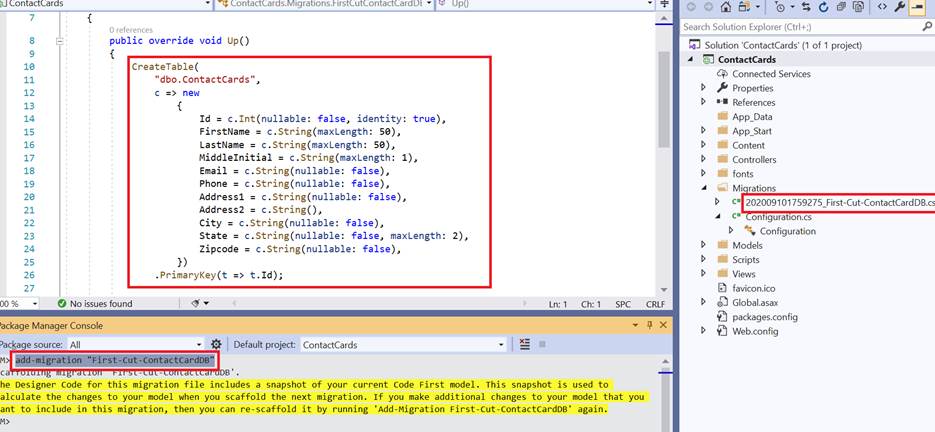
Add Migration –
Now, the next step is to add the Migration point or the DB update version which tells Entity Framework to create DDL statements based off of the current Model classes in Model folder. So, Issue command add-migration “First-Cut-ContactCardDB” from PM console and you will see below results –
Last Step in DB creation – Create Database –
Now, the last step is to create database. For this, we use ‘update-database’ command at PM console as shown below –
Issuing above command tells Entity Framework to look into the versioned DB update file 202009xxxx and execute the ‘down’ and ‘up’ command – basically the DDL create table statement which was created from ContactCard.cs. On successful creation, you can verify the DB by going to the SQServer Object Explorer as shown below –

Step 4: Create Controllers and Views
Now that we have laid out the basic data structure and its physical design, we will put together views and controllers to build the UI to enable data management and the basic reporting of the contacts list. I recommend that you build the Views and Controllers from scratch so you learn the foundation. You would create the Controller/s first based on the data management and reporting needs. For eg: in our case, we would need the ability to Add/Edit/Delete Contacts by an internal admin and also the ability to output the contacts list to the public. So, we start with creating a Controller class whose name goes by <ModelClassName>sController.cs. So our controller will be named as ContactCardsController.cs.
In MVC land, we generally correlate the basic data management functions in the same literal sense when we name the controller methods and the corresponding views. The ‘index’ method is generally the root of the controller as defined in your Default route (Route.config). The corresponding view will be named as Index.cshtml and placed under the Views/ContactCards folder. Note that the View subfolder is named according to the Controller name minus the ‘Controller’ word. We will be using razor front end scripting for creating our views. To manage the Add, Edit, Delete features, we will create Create, Edit, Delete controller methods and corresponding Views respectively.
So, we will end up creating below controller and the corresponding code to allow Create, Edit, Delete of contacts and the basic listing of the contact. Please do your home-work learning the basic C# programming, Linq and razor coding so you understand its usage in the controller methods and the C# code blocks within razor.
ContactCardsController.cs
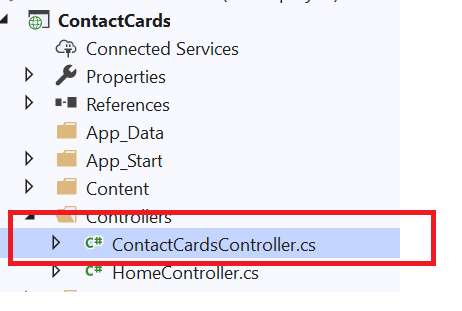
Right click on ‘Controllers’ folder and select new class and create the controller class. Below is a sample Controller code to allow Create, Edit, Delete and Contact list operations.
using System.Data.Entity;
using System.Linq;
using System.Net;
using System.Web.Mvc;
using ContactCards.Models;

namespace ContactCards.Controllers
{
    public class ContactCardsController : Controller
    {
        private readonly ContactCardContext db = new ContactCardContext();

        // GET: ContactCards
 [AllowAnonymous]
        public ActionResult Index()
        {
            return View(db.ContactCards.ToList());
        }

        // GET: ContactCards/Create
        public ActionResult Create()
        {
            return View();
        }

        // POST: ContactCards/Create

        [HttpPost]
        [ValidateAntiForgeryToken]
        public ActionResult Create(ContactCard contactCard)
        {
            if (ModelState.IsValid)
            {
                db.ContactCards.Add(contactCard);
                db.SaveChanges();
                return RedirectToAction("Index");
            }

            return View(contactCard);
        }

        // GET: ContactCards/Edit/5
        public ActionResult Edit(int? id)
        {
            if (id == null)
            {
                return new HttpStatusCodeResult(HttpStatusCode.BadRequest);
            }
            ContactCard contactCard = db.ContactCards.Find(id);
            if (contactCard == null)
            {
                return HttpNotFound();
            }
            return View(contactCard);
        }

        // POST: ContactCards/Edit/5

        [HttpPost]
        [ValidateAntiForgeryToken]
        public ActionResult Edit(ContactCard contactCard)
        {
            if (ModelState.IsValid)
            {
                db.Entry(contactCard).State = EntityState.Modified;
                db.SaveChanges();
                return RedirectToAction("Index");
            }
            return View(contactCard);
        }

        // GET: ContactCards/Delete/5
        public ActionResult Delete(int? id)
        {
            if (id == null)
            {
                return new HttpStatusCodeResult(HttpStatusCode.BadRequest);
            }
            ContactCard contactCard = db.ContactCards.Find(id);
            if (contactCard == null)
            {
                return HttpNotFound();
            }
            return View(contactCard);
        }

        // POST: ContactCards/Delete/x
        [HttpPost, ActionName("Delete")]
        [ValidateAntiForgeryToken]
        public ActionResult DeleteConfirmed(int id)
        {
            ContactCard contactCard = db.ContactCards.Find(id);
            db.ContactCards.Remove(contactCard);
            db.SaveChanges();
            return RedirectToAction("Index");
        }

        protected override void Dispose(bool disposing)
        {
            if (disposing)
            {
                db.Dispose();
            }
            base.Dispose(disposing);
        }
    }
}
I will only point out certain relevant points here regarding the Controller. Note that we have only used the required using directives to deal with MVC actions. We created the ‘db’ private readonly property to inject the DbContext to tap into the Database via EntityFramework. The Index() method creates a list of current contacts and returns to the index.cshtml View to output the list. Note that this method is decorated as ‘AllowAnonymous’ which will bypass authorization and allows to expose the data list outside the intranet.
The ‘Create’ method is polymorphic and the method with empty parameter ( Create() ) allows for the display of the create.cshtml View (the form that captures Contacts data) and the method signature which takes in the submitted ContactsCards model ( Create(ContactCard contactCard) ), allows for the validation of the incoming Model data and final push into the Database.
The ‘Edit’ method is polymorphic as well and the method with id parameter ( Edit(int? id) ) allows for the display of the edit.cshtml View (the form that displays edit form filled with Contacts data) and the method signature which takes in the submitted ContactsCards model ( Edit(ContactCard contactCard) ), allows for the validation of the incoming edited Model data and its final push into the Database.
The Delete methods works in the same fashion as they are invoked with the ‘id’ being passed to indicate which record to delete. There is a delete confirmation page that gets displayed before the final DeleteConfirmed(int id) method is called.
Views or the UI
Before we talk about views, let’s do some basic house-keeping on the application home page and main menu on the top that VS created for you by default. If you run the project, you will see a default home page that gets routed via the Home controller and its View under Views/Home/index.cshtml. HomeController.cs is automatically created for you and you may keep it, remodel it etc. For eg: you can remodel it as your application home page with some cool graphics, sliders or custom menu and content if you are building a web-site. You can keep the About Us and Contact Us Views as you need it. For our scenario, we decide to keep the home page as the contacts list page and we don’t need the about us and contact us page.
Here is how we do above UI changes –
Change the top menu to fit your application need – Edit Views/Shared/_Layout.cshtml with the following razor code –
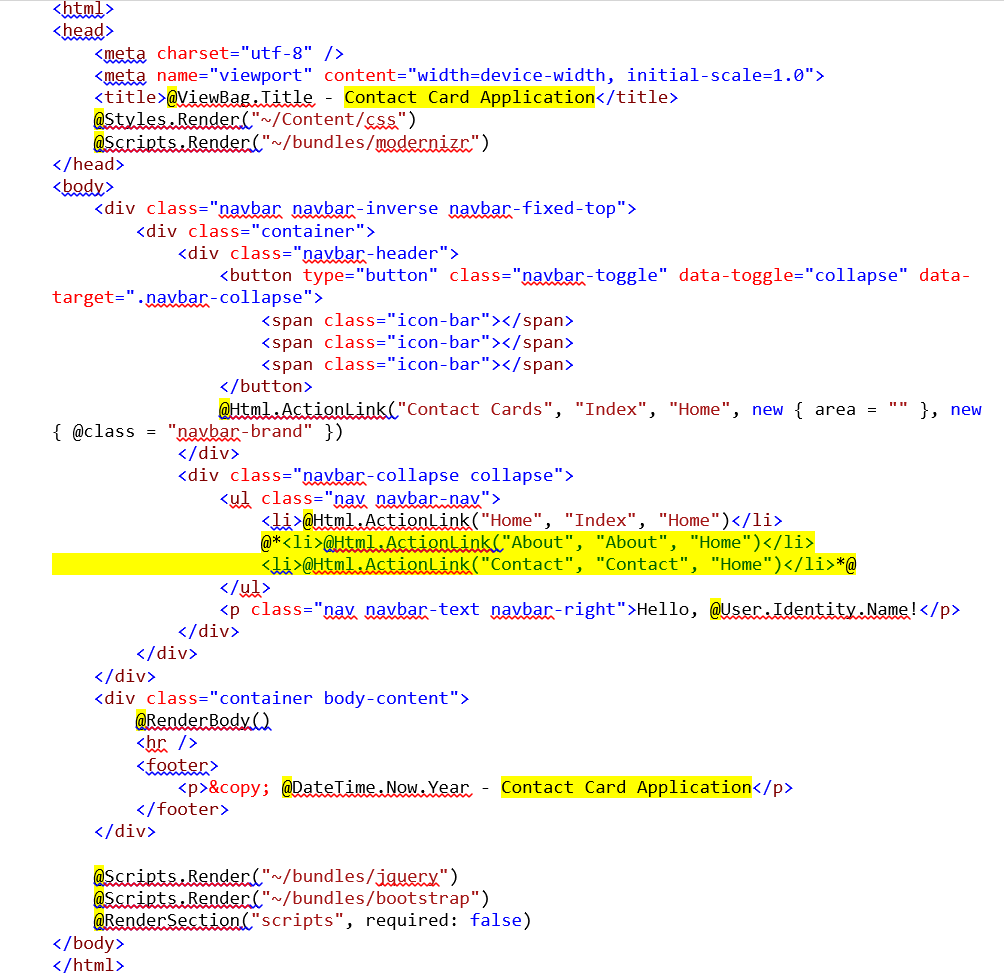
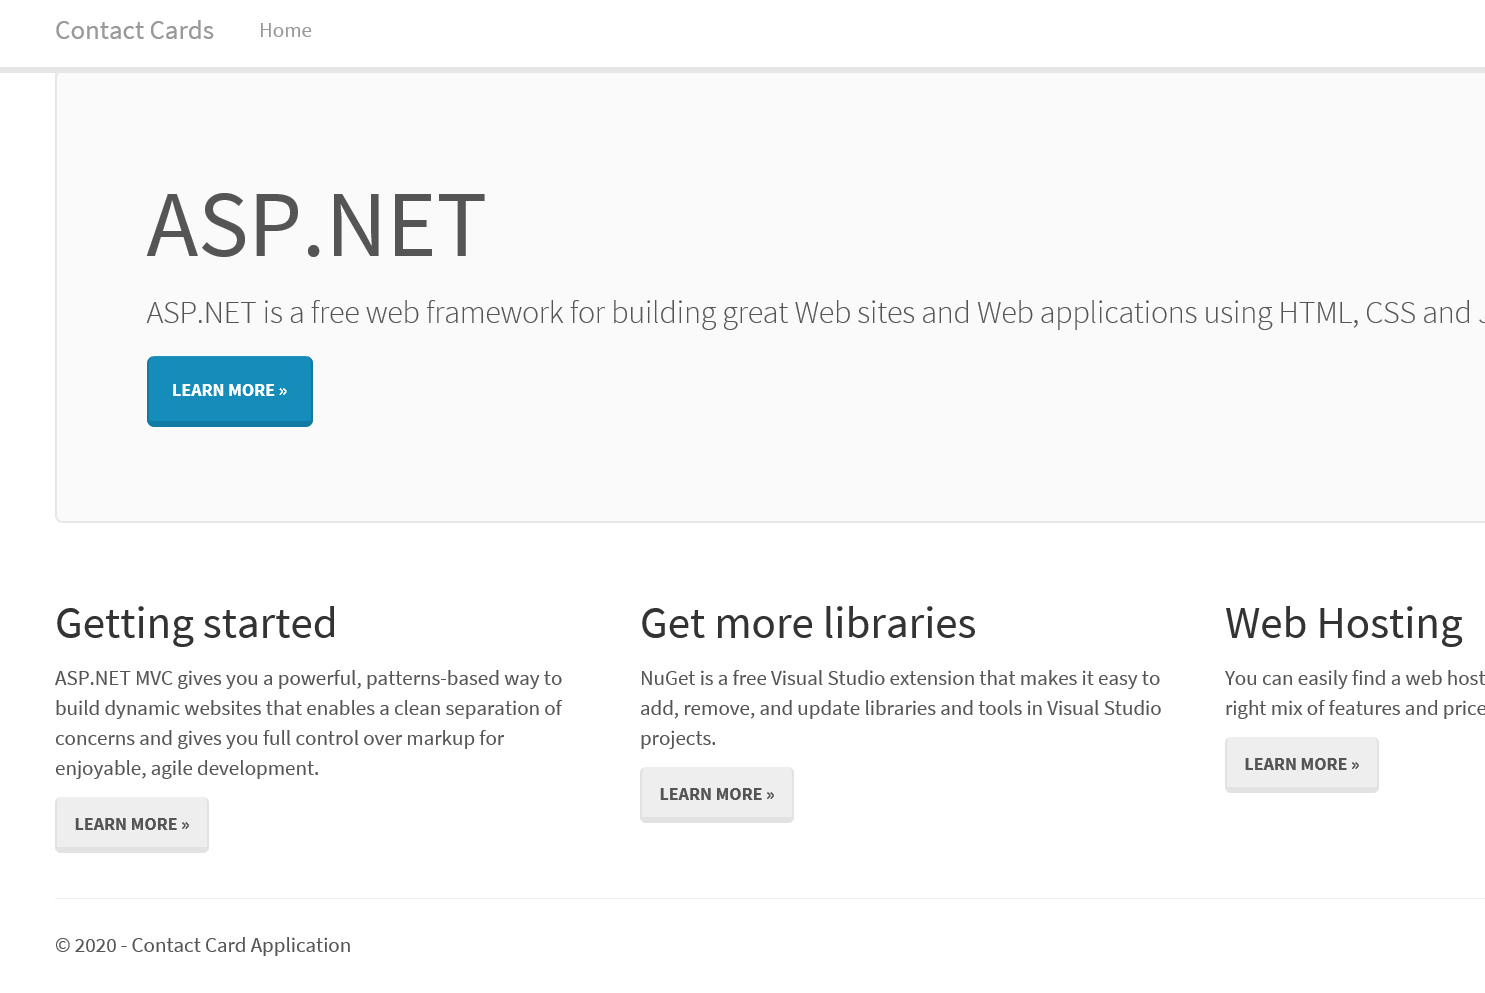
Note the yellow highlighted areas where we modified the page title, menu and footer display to fit our needs. As you Cntrl+F5, your home page should now look like below –
We will now see the 4 main Views that we will be creating to enable various functions for the web application. Towards the end of this tutorial, we will see how to link ‘Home’ link to the Contacts Index View to complete the wiring.
Main Views
Below are the main views that we will be creating to deal with the basic functionality of our application –
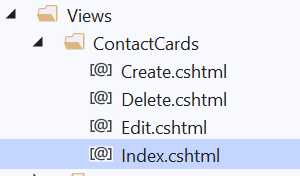
Contacts List Index Page (Views/ContactCards/Index.cshtml)
The contact list view is created under Views/ContactCards folder as Index.cshtml. As we saw before, Index() method within ContactCardsController.cs spits out the contacts list on to this view. Note the naming conventions and how MVC makes sure it orchestrates the process flow from Controller to Model and back to the View. Below is the code for contacts list Index view –
@model IEnumerable<ContactCards.Models.ContactCard>

@{
    ViewBag.Title = "Contacts List";
    Layout = "~/Views/Shared/_Layout.cshtml";
}

<h2>Contacts List</h2>

<p>
    @Html.ActionLink("Create New", "Create")
</p>
<table class="table-hover table-striped" width="100%">
    <tr>
        <th>
            @Html.DisplayNameFor(model => model.FirstName)
        </th>
        <th>
            @Html.DisplayNameFor(model => model.LastName)
        </th>
        <th>
            @Html.DisplayNameFor(model => model.MiddleInitial)
        </th>
        <th>
            @Html.DisplayNameFor(model => model.Email)
        </th>
        <th>
            @Html.DisplayNameFor(model => model.Phone)
        </th>
        <th>
            @Html.DisplayNameFor(model => model.Address1)
        </th>
        <th>
            @Html.DisplayNameFor(model => model.Address2)
        </th>
        <th>
            @Html.DisplayNameFor(model => model.City)
        </th>
        <th>
            @Html.DisplayNameFor(model => model.State)
        </th>
        <th>
            @Html.DisplayNameFor(model => model.Zipcode)
        </th>
        <th></th>
    </tr>

@foreach (var item in Model) {
    <tr>
        <td>
            @Html.DisplayFor(modelItem => item.FirstName)
        </td>
        <td>
            @Html.DisplayFor(modelItem => item.LastName)
        </td>
        <td>
            @Html.DisplayFor(modelItem => item.MiddleInitial)
        </td>
        <td>
            @Html.DisplayFor(modelItem => item.Email)
        </td>
        <td>
            @Html.DisplayFor(modelItem => item.Phone)
        </td>
        <td>
            @Html.DisplayFor(modelItem => item.Address1)
        </td>
        <td>
            @Html.DisplayFor(modelItem => item.Address2)
        </td>
        <td>
            @Html.DisplayFor(modelItem => item.City)
        </td>
        <td>
            @Html.DisplayFor(modelItem => item.State)
        </td>
        <td>
            @Html.DisplayFor(modelItem => item.Zipcode)
        </td>
        <td>
            @Html.ActionLink("Edit", "Edit", new { id=item.Id }) |
            @Html.ActionLink("Delete", "Delete", new { id=item.Id })
        </td>
    </tr>
}

</table>
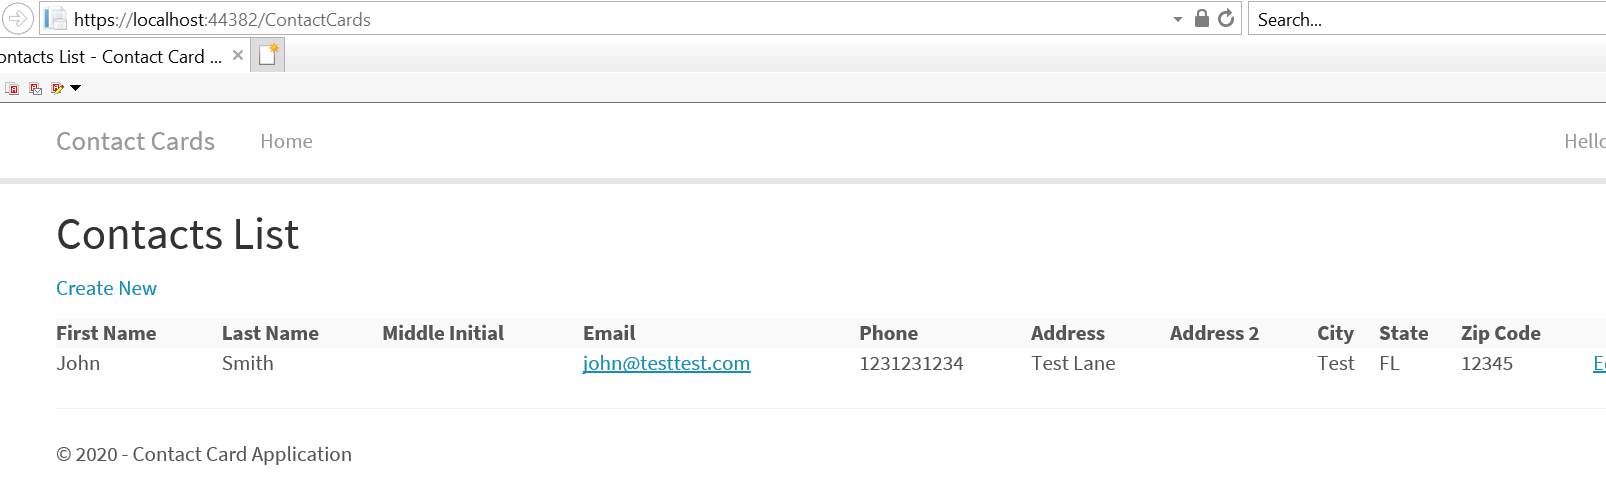
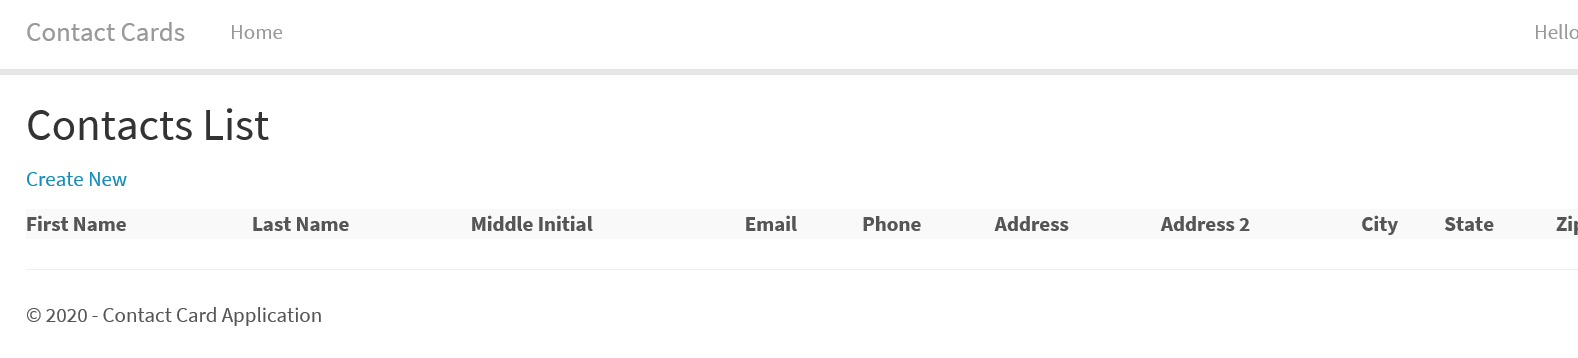
Note that on the top, we include the base Model which will be used to extract data from, which is the ContactCard model. With your C# background, you should know that IEnumerable creates an Enumerable list of ContactCard so we can iterate over it and print the list. We use basic razor functions such as DisplayNameFor and DisplayFor to display the Model field name (this will be overridden by the DataAnnotation attribute in Model class if you have used it to decorate the DB field) and the corresponding field value from DB. Also note the basic bootstrap table css to make it look more professional and responsive. The ‘Edit’ and ‘Delete’ links are wired to the respective Views to enable Edit and Delete operations. If you run your app now and go to /ContactCards the index page should look like below –
Create View (Views/ContactCards/Create.cshtml)
The create view is created under Views/ContactCards folder as Create.cshtml. As we saw before, Create() method within ContactCardsController.cs displays this view which is basically the Create form to capture contacts input data. Below is the razor code for Create view –
@model ContactCards.Models.ContactCard

@{
    ViewBag.Title = "Create New Contact";
    Layout = "~/Views/Shared/_Layout.cshtml";
}

<h2>Create New Contact</h2>


@using (Html.BeginForm())
{
    @Html.AntiForgeryToken()

    <div class="form-horizontal">
        <hr />
        @Html.ValidationSummary(true, "", new { @class = "text-danger" })
        <div class="form-group">
            @Html.LabelFor(model => model.FirstName, htmlAttributes: new { @class = "control-label col-md-2" })
            <div class="col-md-10">
                @Html.EditorFor(model => model.FirstName, new { htmlAttributes = new { @class = "form-control" } })
                @Html.ValidationMessageFor(model => model.FirstName, "", new { @class = "text-danger" })
            </div>
        </div>

        <div class="form-group">
            @Html.LabelFor(model => model.LastName, htmlAttributes: new { @class = "control-label col-md-2" })
            <div class="col-md-10">
                @Html.EditorFor(model => model.LastName, new { htmlAttributes = new { @class = "form-control" } })
                @Html.ValidationMessageFor(model => model.LastName, "", new { @class = "text-danger" })
            </div>
        </div>

        <div class="form-group">
            @Html.LabelFor(model => model.MiddleInitial, htmlAttributes: new { @class = "control-label col-md-2" })
            <div class="col-md-10">
                @Html.EditorFor(model => model.MiddleInitial, new { htmlAttributes = new { @class = "form-control" } })
                @Html.ValidationMessageFor(model => model.MiddleInitial, "", new { @class = "text-danger" })
            </div>
        </div>

        <div class="form-group">
            @Html.LabelFor(model => model.Email, htmlAttributes: new { @class = "control-label col-md-2" })
            <div class="col-md-10">
                @Html.EditorFor(model => model.Email, new { htmlAttributes = new { @class = "form-control" } })
                @Html.ValidationMessageFor(model => model.Email, "", new { @class = "text-danger" })
            </div>
        </div>

        <div class="form-group">
            @Html.LabelFor(model => model.Phone, htmlAttributes: new { @class = "control-label col-md-2" })
            <div class="col-md-10">
                @Html.EditorFor(model => model.Phone, new { htmlAttributes = new { @class = "form-control" } })
                @Html.ValidationMessageFor(model => model.Phone, "", new { @class = "text-danger" })
            </div>
        </div>

        <div class="form-group">
            @Html.LabelFor(model => model.Address1, htmlAttributes: new { @class = "control-label col-md-2" })
            <div class="col-md-10">
                @Html.EditorFor(model => model.Address1, new { htmlAttributes = new { @class = "form-control" } })
                @Html.ValidationMessageFor(model => model.Address1, "", new { @class = "text-danger" })
            </div>
        </div>

        <div class="form-group">
            @Html.LabelFor(model => model.Address2, htmlAttributes: new { @class = "control-label col-md-2" })
            <div class="col-md-10">
                @Html.EditorFor(model => model.Address2, new { htmlAttributes = new { @class = "form-control" } })
                @Html.ValidationMessageFor(model => model.Address2, "", new { @class = "text-danger" })
            </div>
        </div>

        <div class="form-group">
            @Html.LabelFor(model => model.City, htmlAttributes: new { @class = "control-label col-md-2" })
            <div class="col-md-10">
                @Html.EditorFor(model => model.City, new { htmlAttributes = new { @class = "form-control" } })
                @Html.ValidationMessageFor(model => model.City, "", new { @class = "text-danger" })
            </div>
        </div>

        <div class="form-group">
            @Html.LabelFor(model => model.State, htmlAttributes: new { @class = "control-label col-md-2" })
            <div class="col-md-10">
                @Html.EditorFor(model => model.State, new { htmlAttributes = new { @class = "form-control" } })
                @Html.ValidationMessageFor(model => model.State, "", new { @class = "text-danger" })
            </div>
        </div>

        <div class="form-group">
            @Html.LabelFor(model => model.Zipcode, htmlAttributes: new { @class = "control-label col-md-2" })
            <div class="col-md-10">
                @Html.EditorFor(model => model.Zipcode, new { htmlAttributes = new { @class = "form-control" } })
                @Html.ValidationMessageFor(model => model.Zipcode, "", new { @class = "text-danger" })
            </div>
        </div>

        <div class="form-group">
            <div class="col-md-offset-2 col-md-10">
                <input type="submit" value="Create" class="btn btn-default" />
            </div>
        </div>
    </div>
}

<div>
    @Html.ActionLink("Back to List", "Index")
</div>

@section Scripts {
    @Scripts.Render("~/bundles/jqueryval")
}
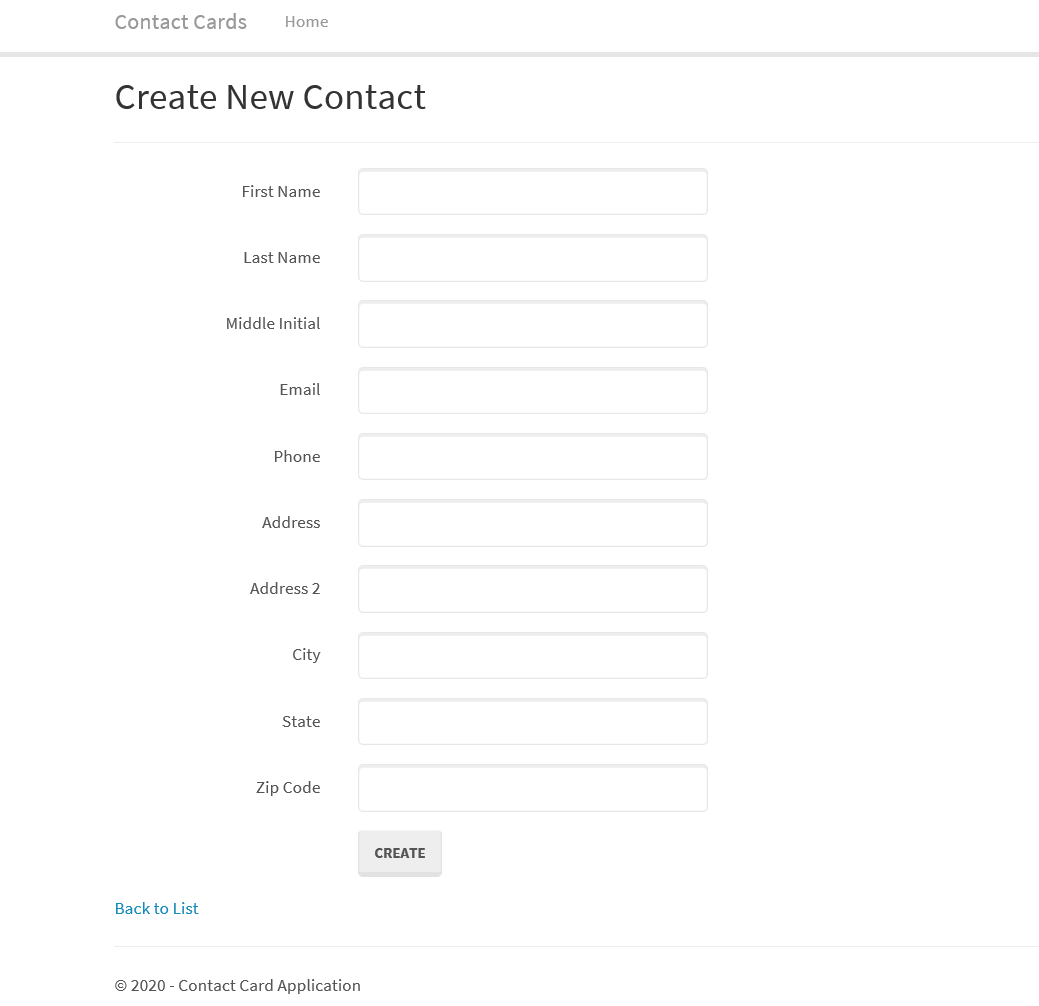
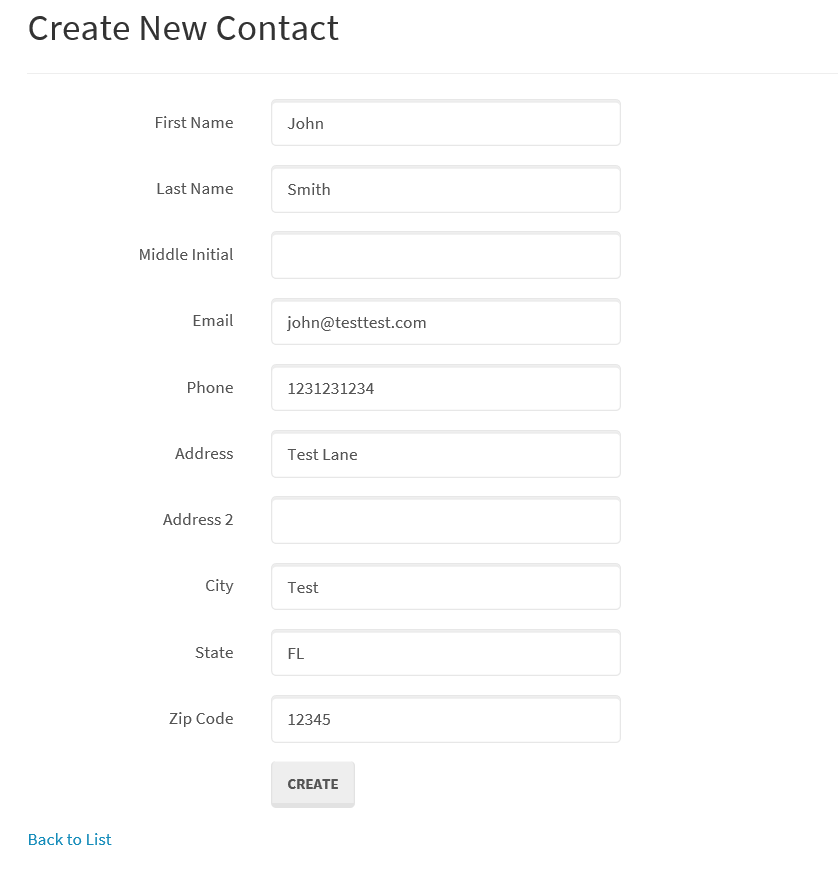
I am not going into details of how to write razor code, will leave that with you as your homework. Some notable things are the model that is included on top and various @Html razor functions to display the validation summary, html label, objects, links etc. If you click on the ‘Create New’ link on the Contacts List page, it should display below form –
Once user enters data and clicks ‘CREATE’ button, the form gets posted onto Create(ContactCard contactCard) method within ContactCardsController and data gets processed there. If there is a validation error, it fails on if (ModelState.IsValid) and the method returns back to the Create View with the raised Model error.
See below for an eg: where the client side validation is triggered by the razor html –
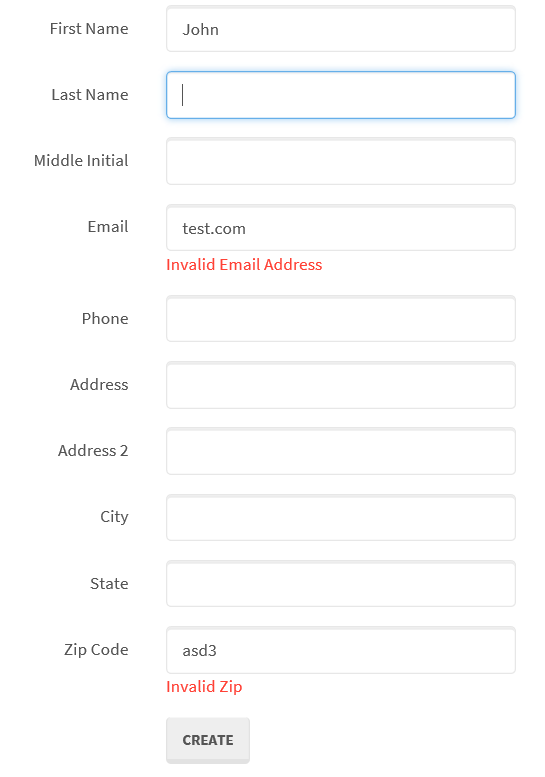
This gets triggered from the @Html.ValidationMessageFor razor function which already interrogated the Model DataAnnotation and determined the client side validation and error message for it. In this particular case, it’s an invalid email or zipcode.
Below is an example for an error that is raised within the Controller after data is posted –
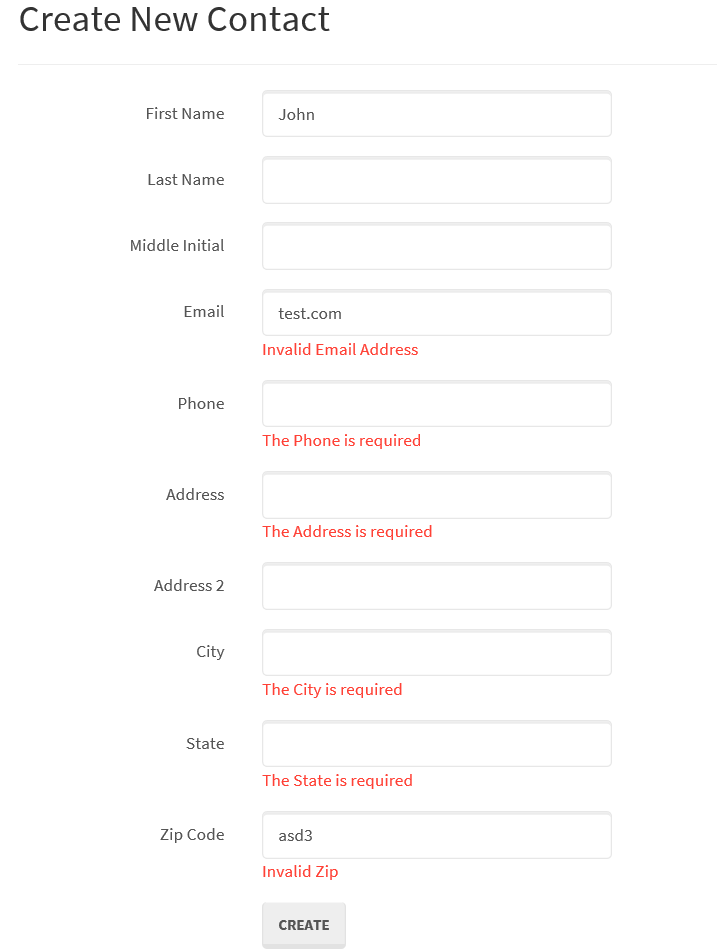
As you can see the required fields are checked before controller method invokes the DB functions to finally insert the data. This check is performed by the ‘if (ModelState.IsValid) ‘ check.
If you enter valid data as shown below,
…. data will be inserted into DB and the Controller method will redirect you to the Contacts list Index page as show below –
Edit View (Views/ContactCards/Edit.cshtml)
The edit view is created under Views/ContactCards folder as Edit.cshtml. As we saw before, Edit(int? id) method within ContactCardsController.cs displays this view which is basically the Edit form to edit contacts data. Note that Edit method need to be invoked with an id that points to the specific DB record. Below is the razor code for Edit view –
@model ContactCards.Models.ContactCard

@{
    ViewBag.Title = "Edit Contact";
    Layout = "~/Views/Shared/_Layout.cshtml";
}

<h2>Edit Contact</h2>


@using (Html.BeginForm())
{
    @Html.AntiForgeryToken()

    <div class="form-horizontal">
        <hr />
        @Html.ValidationSummary(true, "", new { @class = "text-danger" })
        @Html.HiddenFor(model => model.Id)

        <div class="form-group">
            @Html.LabelFor(model => model.FirstName, htmlAttributes: new { @class = "control-label col-md-2" })
            <div class="col-md-10">
                @Html.EditorFor(model => model.FirstName, new { htmlAttributes = new { @class = "form-control" } })
                @Html.ValidationMessageFor(model => model.FirstName, "", new { @class = "text-danger" })
            </div>
        </div>

        <div class="form-group">
            @Html.LabelFor(model => model.LastName, htmlAttributes: new { @class = "control-label col-md-2" })
            <div class="col-md-10">
                @Html.EditorFor(model => model.LastName, new { htmlAttributes = new { @class = "form-control" } })
                @Html.ValidationMessageFor(model => model.LastName, "", new { @class = "text-danger" })
            </div>
        </div>

        <div class="form-group">
            @Html.LabelFor(model => model.MiddleInitial, htmlAttributes: new { @class = "control-label col-md-2" })
            <div class="col-md-10">
                @Html.EditorFor(model => model.MiddleInitial, new { htmlAttributes = new { @class = "form-control" } })
                @Html.ValidationMessageFor(model => model.MiddleInitial, "", new { @class = "text-danger" })
            </div>
        </div>

        <div class="form-group">
            @Html.LabelFor(model => model.Email, htmlAttributes: new { @class = "control-label col-md-2" })
            <div class="col-md-10">
                @Html.EditorFor(model => model.Email, new { htmlAttributes = new { @class = "form-control" } })
                @Html.ValidationMessageFor(model => model.Email, "", new { @class = "text-danger" })
            </div>
        </div>

        <div class="form-group">
            @Html.LabelFor(model => model.Phone, htmlAttributes: new { @class = "control-label col-md-2" })
            <div class="col-md-10">
                @Html.EditorFor(model => model.Phone, new { htmlAttributes = new { @class = "form-control" } })
                @Html.ValidationMessageFor(model => model.Phone, "", new { @class = "text-danger" })
            </div>
        </div>

        <div class="form-group">
            @Html.LabelFor(model => model.Address1, htmlAttributes: new { @class = "control-label col-md-2" })
            <div class="col-md-10">
                @Html.EditorFor(model => model.Address1, new { htmlAttributes = new { @class = "form-control" } })
                @Html.ValidationMessageFor(model => model.Address1, "", new { @class = "text-danger" })
            </div>
        </div>

        <div class="form-group">
            @Html.LabelFor(model => model.Address2, htmlAttributes: new { @class = "control-label col-md-2" })
            <div class="col-md-10">
                @Html.EditorFor(model => model.Address2, new { htmlAttributes = new { @class = "form-control" } })
                @Html.ValidationMessageFor(model => model.Address2, "", new { @class = "text-danger" })
            </div>
        </div>

        <div class="form-group">
            @Html.LabelFor(model => model.City, htmlAttributes: new { @class = "control-label col-md-2" })
            <div class="col-md-10">
                @Html.EditorFor(model => model.City, new { htmlAttributes = new { @class = "form-control" } })
                @Html.ValidationMessageFor(model => model.City, "", new { @class = "text-danger" })
            </div>
        </div>

        <div class="form-group">
            @Html.LabelFor(model => model.State, htmlAttributes: new { @class = "control-label col-md-2" })
            <div class="col-md-10">
                @Html.EditorFor(model => model.State, new { htmlAttributes = new { @class = "form-control" } })
                @Html.ValidationMessageFor(model => model.State, "", new { @class = "text-danger" })
            </div>
        </div>

        <div class="form-group">
            @Html.LabelFor(model => model.Zipcode, htmlAttributes: new { @class = "control-label col-md-2" })
            <div class="col-md-10">
                @Html.EditorFor(model => model.Zipcode, new { htmlAttributes = new { @class = "form-control" } })
                @Html.ValidationMessageFor(model => model.Zipcode, "", new { @class = "text-danger" })
            </div>
        </div>

        <div class="form-group">
            <div class="col-md-offset-2 col-md-10">
                <input type="submit" value="Save" class="btn btn-default" />
            </div>
        </div>
    </div>
}

<div>
    @Html.ActionLink("Back to List", "Index")
</div>

@section Scripts {
    @Scripts.Render("~/bundles/jqueryval")
}
You will see that the razor code for the Edit form looks very similar to the Create view with one exception of the hidden field that is added on the Edit form which will be passed to the Edit controller to link it back to the DB row where the Edit will be posted to.
Clicking on the ‘Edit’ link on the Contacts list Index page, below Edit form is loaded.
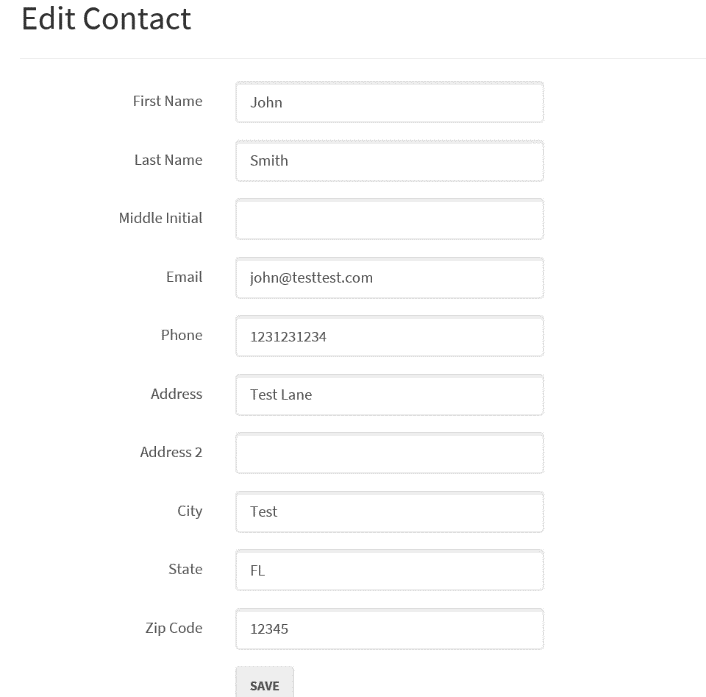
Once you submit, the posted data is saved against the linked ‘id’ and the controller method redirects you back to the contacts list page. Validations and such works similar to the Create function.
Delete View (Views/ContactCards/Delete.cshtml)
The delete view is created under Views/ContactCards folder as Delete.cshtml. Below is the razor code for Delete view –
@model ContactCards.Models.ContactCard

@{
    ViewBag.Title = "Delete Contact";
    Layout = "~/Views/Shared/_Layout.cshtml";
}

<h3>Are you sure you want to delete this?</h3>
<div>
    <hr />
    <dl class="dl-horizontal">
        <dt>
            @Html.DisplayNameFor(model => model.FirstName)
        </dt>

        <dd>
            @Html.DisplayFor(model => model.FirstName)
        </dd>

        <dt>
            @Html.DisplayNameFor(model => model.LastName)
        </dt>

        <dd>
            @Html.DisplayFor(model => model.LastName)
        </dd>

        <dt>
            @Html.DisplayNameFor(model => model.MiddleInitial)
        </dt>

        <dd>
            @Html.DisplayFor(model => model.MiddleInitial)
        </dd>

        <dt>
            @Html.DisplayNameFor(model => model.Email)
        </dt>

        <dd>
            @Html.DisplayFor(model => model.Email)
        </dd>

        <dt>
            @Html.DisplayNameFor(model => model.Phone)
        </dt>

        <dd>
            @Html.DisplayFor(model => model.Phone)
        </dd>

        <dt>
            @Html.DisplayNameFor(model => model.Address1)
        </dt>

        <dd>
            @Html.DisplayFor(model => model.Address1)
        </dd>

        <dt>
            @Html.DisplayNameFor(model => model.Address2)
        </dt>

        <dd>
            @Html.DisplayFor(model => model.Address2)
        </dd>

        <dt>
            @Html.DisplayNameFor(model => model.City)
        </dt>

        <dd>
            @Html.DisplayFor(model => model.City)
        </dd>

        <dt>
            @Html.DisplayNameFor(model => model.State)
        </dt>

        <dd>
            @Html.DisplayFor(model => model.State)
        </dd>

        <dt>
            @Html.DisplayNameFor(model => model.Zipcode)
        </dt>

        <dd>
            @Html.DisplayFor(model => model.Zipcode)
        </dd>

    </dl>

    @using (Html.BeginForm()) {
        @Html.AntiForgeryToken()

        <div class="form-actions no-color">
            <input type="submit" value="Delete" class="btn btn-default" /> |
            @Html.ActionLink("Back to List", "Index")
        </div>
    }
</div>
Delete view is invoked by clicking on the ‘Delete’ link on the contacts list page. This will pass in the id of the record onto Delete(int? id) method which further displays a confirmation page (above razor code) with details of the contact and asking user to confirm Delete as shown below –

Once user press ‘Delete’ button, control is passed to DeleteConfirmed(int id) where the record is deleted invoking the Linq query db.ContactCards.Remove(contactCard)
Link Home page and ‘Home’ menu item on top menu to Contacts list Index page
As a final step in building the web application, we will replace the current home page with the contacts list index page and will do the same for the ‘Home’ menu item on the top.
To do this, just replace the code within Index() method of HomeController.cs with below code –
return RedirectToAction("Index", "ContactCards");
Basically, we are redirecting the Action result to the Index method of ContactCards controller. That’s it! Your web application to manage Contact Cards is complete. Your home page should now load as below –