Container Orchestration with Kubernetes
The ability to deploy and manage applications over containers as opposed to the traditional VMs is the building block and core concept that enables cloud based architectural setup, specifically any PaaS provider – whether its AWS or Google Cloud or MS Azure Cloud. The modern-day cloud native applications are tightly coupled with streamlined build/test/integrate/deploy pipelines that involve continuous integration and deployment over scalable and self-healing application containers residing on a Cloud service provider. For example, a product centric company may utilize 100s of thousands or in some cases in millions (Google needs 2 billion containers each week – meaning every hour they spin up about 3300 containers).
Deploying an app on containers is not the end to successfully running a SaaS application which is used by millions of customers. You need to make sure that your deployment and management is seamless, scalable, secure, self-healing and you only pay for the resources that you actually use. Kubernetes or K8S emerged out of this need at Google to allow for a platform service which can control and manage containerized application deployed as workloads and services over a cloud infrastructure hardware. Google later made K8S as an open-source platform which is now available as one of the prominent container orchestration platforms across any cloud service provider.
Basic K8S Architecture
It’s important to understand the basic architecture of a K8S platform to know how it performs and achieves the goals of enabling creation and deployment of your containerized workloads (applications) across a cluster of machines without tying to a specific host offering 0 downtime deployment and scaling, enabling it to be run as services, enabling it to be scalable based on your needs and its self-healing nature. When you sign up for a K8S engine in any cloud provider or your own environment, you are essentially defining and creating your K8S cluster of machines (physical or virtual) that are set up as group of Master (also called Control plane) and Worker nodes. Worker nodes is where you deploy and scale your workloads whereas the Control plane or Master node has K8S specific components that control and manage the node operation and orchestration. Below is an overall view of K8S architecture to make it easy to visualize what is involved here –
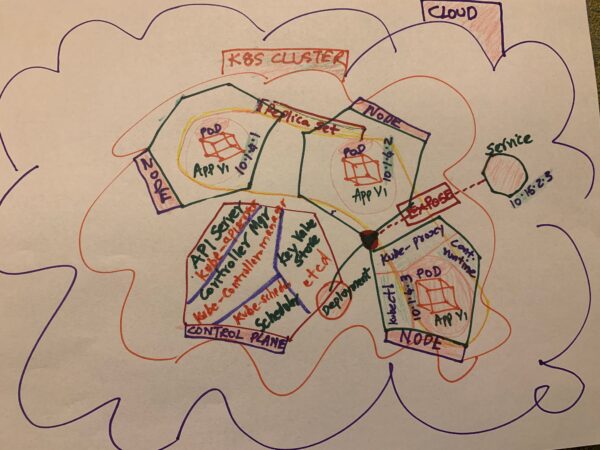
The diagram shows the overall Cloud infrastructure (eg: lets say Google Cloud infrastructure across the globe) where a K8S cluster is created by someone to deploy and expose a containerized application to the customer base. The cluster is nothing but a group of machines (primarily Linux boxes) that can virtualize and logically build the K8S architectural components needed to host and manage containerized applications without you having to create and manage the infrastructure to host and expose your application to your userbase. In the below sections we will learn more about the K8S architectural components and how the platform accomplishes the goal of container orchestration by relating to the various steps from creation of cluster to exposing of your application to the outside world.
Creating K8S Cluster
To quickly see what components and concepts are involved as related to your containerized application and the K8S cluster on the Cloud, let’s recollect what happened when we deployed our sample .NetCore app on the Google K8S cluster. As you remember, we started with creating an account with Google cloud, creating new project and creating the K8S cluster. Cluster is the technical term for the Cloud infrastructure which is usually a collection of physical or logical machines that collectively function as the platform for K8S to enable the creation and orchestration of your workloads. The question might arise as to how many clusters do I need to create for a production application. The most common option is to create one single cluster and virtualize the usage for various regions (Test/Stage/Prod) based on namespaces (a concept in K8S which is easily applicable to logically separate the cluster nodes).
When you create a K8S cluster, three major components are created – the Cluster itself, the Master node or the Control plane and the Worker nodes or simply the Nodes. This sets up the basic Infrastructure as a Service (IaaS) for you to deploy and manage your workloads.
Control Plane/Master Node: As indicated in the diagram above, the Control plane consists of the API server, the Controller or the kube-controller-manager, the Scheduler or the kube-scheduler and the key-value store or the distributed DB called the etcd (remember, these are Linux boxes). K8S platform is built in such a way that each individual component exists and operates under its own separation of concern (single responsibility). The API server allows the K8S to have seamless communication across the individual components and also between external systems / tools (eg: kubectl) and the cluster. The kube-controller-manager controls all the Nodes functions and ensure that they always up and running with the actual state matching the desired state. If you are not running Kubernetes locally, you will also have the cloud-controller-manager that separates your API interaction with the cloud provider specific functions from the cluster specific functions. The kube-scheduler ensures that desired pods are spin up and down according to the desired state of the replica sets and resource requirements (eg: CPU), as the application is created, deployed, exposed and scaled up / down. The etcd is the key-value pair store that stores a database of K8S resource configuration and state that aids while scaling up / down the nodes and controlling other node operations involving deployments, service creation etc. To ensure fail safe and highly available operation, it is desirable to have at least 3 nodes within a cluster and keeping more than copy of your etcd so you won’t lose your node state. Below is a K8S command that you can use to see the control plane component status –
deepeshjoseph@cloudshell:~ (trim-mile-393018)$ kubectl get componentstatuses
Warning: v1 ComponentStatus is deprecated in v1.19+
NAME                STATUS  MESSAGE           ERROR
controller-manager  Healthy ok
scheduler           Healthy ok
etcd-1              Healthy {"health":"true"}
etcd-0              Healthy {"health":"true"}
Note that the K8S created two versions of etcd for you to be fail-safe.
Worker Nodes (where your application is): Worker nodes or simply Nodes are where your application containers are deployed. A node can hold a single or multiple application containers.
Deploying containerized application to the K8S Cluster
The next step after creating the K8S Cluster was to deploy your application container image on to your cluster through this command –
kubectl create deployment dotnet-on-docker --image=djosephdocker/dotnet-on-docker:0.0.1.RELEASE
When you deployed your docker image on to the K8S cluster, based on the default settings, it deployed the container images onto 3 available nodes with the application containers housed on a pod per each node and a replica set with a desired state of 3 nodes (meaning your app will aways run on 3 nodes to provide fail safe operation) was created as well. Refer back to the diagram to appreciate how this is visualized where App V1 is deployed across 3 nodes under the replica set marked under the yellow blob. We will see what a node, pod, replica set, deployment and service is in some detail.
Node: As we saw above, nodes are created when you create the cluster. A node basically has 4 components to enable its function of hosting your containerized workloads namely – kubelet, kube-proxy, Container runtime and the pods. The job of kubelet is to make sure the containers are created and run in a pod as per the podspecs and synchronize the overall node health back to the Control plane (For eg: when a node goes down or a pod need to be taken down etc). Kube-proxy acts as the networking proxy that deals with the networking needs of the individual nodes and works in conjunction with the service aspect of your deployment to expose your app externally. Container runtime enables support for various container runtimes such as Docker. Finally, pods are the smallest deployable unit of the node where your container images are deployed.
Execute the below commands on your cloud shell to appreciate how the nodes and pods are created and related to each other.

Note how your app/workload (dotnet-on-docker) is deployed on 3 separate pods with unique id and IPs and that each pod is housed in a separate node. You must be wondering why your application was deployed across 3 pods. The is explained by the existence of the third component that was created when we deployed the container image – the Replica Set.
Replica set defines the desired state of pods. By default, it was 3, hence the application image was deployed in 3 pods. If you refer to the Diagram above, the replica set is logically marked in yellow blob. Replica Set ensures that the specified number of pod replicas are running at all times. Run below command to see the replica set definitions specific to your deployment –

See the container image, container name stored in the replica set definition marked in red and green respectively. Also note how replica set name is tied to the pod names associated with it. K8S uses labels in this way to tie resources together when a specific replica needs to be brought back up. Let’s see a scenario to see how replica set maintains the desired state. As you can see above figure, the desired number of pods is 3. Let delete one pod and see what happens –

As soon as the pod was deleted, replica set ensure that another pod was immediately spun up as the get pods command showed above. Another scenario to experience here is the scale up/down of your application. Lets scale down your application pods to 2 and see what happens –

The command that we used is as below –
kubectl scale deployment dotnet-on-docker --replicas=2
Through this command we are instructing K8S controller and scheduler to modify the deployment by scaling down the replica set by 2 pods and that exactly what you see above after you perform the scaling and once you list the pods – only 2 pods are running now, and the replica set now shows 2 as the desired state.
Note that these 2 important K8S components – replica set and pods – were created when you executed the deployment. The deployment process itself creates a separate K8S resource called deployment.
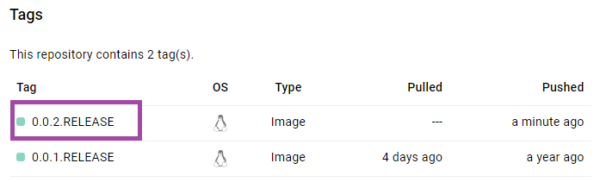
K8S Deployment creates and updates instances of your containerized application image across available nodes. Deployment ensures that the desired replica set is always up with its desired state allowing for rolling updates of your application versions without causing any downtime. Let’s says you have to upgrade your application to V2. K8S deployment allows you to seamlessly perform this upgrade by spinning up new pods under a totally new replica set and sunsetting the old pods on the old replica set in a rolling fashion. To show you a hands-on example, we shall build upon on the exercise that we did in one of the previous articles to create and push Docker images of your application. This time, we make a slight change in the application, so it displays V2 on the home page. The V2 release has been pushed to the Docker repo. as below –
Our goal is to update the current V1 version to this new version of Docker image. Below is the command you would execute to perform this operation marked in light blue –
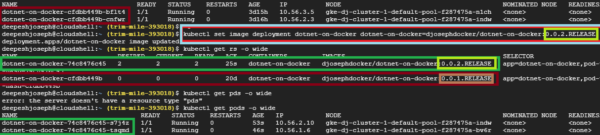
Carefully note the sequence of events. Note how the old pods and replica set was terminated (marked in red) where the desired state is shown as 0 for the replica set – this means that the replica set was terminated along with the corresponding pods. Deployment created the new replica set that spun up 2 new pods running the new image/release/version of the application that you have in your docker repository. To verify the changed application version, load the application on the browser –
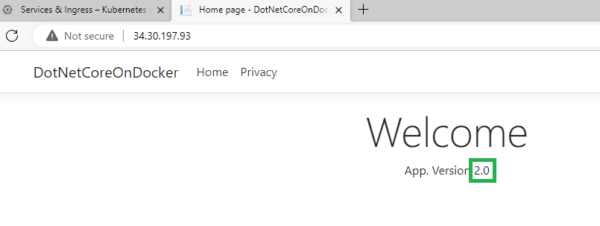
Voila! Your service URL shows the new version of the application loaded!
K8S also allows you to easily rollback your application version using the rollout undo deployment command. Below command rolls back our application back to version 1 –
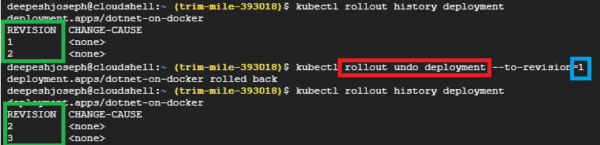
Use rollout history to see the deployment revisions. Revision 1 is what we want to go back to. executing the rollout undo command roll backs the deployment to application version 1 – which effectively set the previous version of Docker image running on the pods. Verify your application at the URL as follows –

Further, when we exposed the application to outside world, it created the service that provided a single IP based URL for the application usage.
Exposing containerized application as Service
If you notice the details of the get nodes command output of kubectl, you can see that all pods have unique IP addresses which is internal to the cluster and is not visible to outside world. Also these IPs changes when you scale up/down the pods. So you need to have a ability to expose your deployed workload to the outside via a single, lifetime, and unchanged IP address and URL through which your application can be accessed by your userbase.
K8S Service enables you to expose your deployment onto the outside world via single, lifetime URL. As you recollect, you expose your workload by below command –
kubectl expose deployment dotnet-on-docker –type=LoadBalancer –port=80
When you execute this command, K8S hooks into the specific cloud provider’ Load Balancing options and creates the Load balancing service which exposes the load balanced service. To see details of K8S Service component, execute below command –

You can see that K8S created the service of type LoadBalancer that exposes your app at the external IP. You can also see that the kubernetes service of type ClusterIP which can be used for internal communication over SSL.
Using YAML configs to manage your deployments seamlessly
One of the main features of Kubernetes is that it is declarative – meaning – it allows you to do of the above operations to create and manage your workload deployments via easy-to-use YAML config files. Let’s create a base structure of your YAML file for deployment and service from your Cloud Sheel using below commands –

Download both files to your source folder and combine them into one file as shown below (Deployment and Service YAMLs can go together and are always managed together)
apiVersion: v1
items:
- apiVersion: apps/v1
  kind: Deployment
  metadata:
    annotations:
      deployment.kubernetes.io/revision: "1"
    creationTimestamp: "2023-09-03T18:26:49Z"
    generation: 1
    labels:
      app: dotnet-on-docker
    name: dotnet-on-docker
    namespace: default
    resourceVersion: "732377"
    uid: db6b5421-0e92-4435-b4a8-4eb36a005be3
  spec:
    progressDeadlineSeconds: 600
    replicas: 1
    revisionHistoryLimit: 10
    selector:
      matchLabels:
        app: dotnet-on-docker
    strategy:
      rollingUpdate:
        maxSurge: 25%
        maxUnavailable: 25%
      type: RollingUpdate
    template:
      metadata:
        creationTimestamp: null
        labels:
          app: dotnet-on-docker
      spec:
        containers:
        - image: djosephdocker/dotnet-on-docker:0.0.1.RELEASE
          imagePullPolicy: IfNotPresent
          name: dotnet-on-docker
          resources: {}
          terminationMessagePath: /dev/termination-log
          terminationMessagePolicy: File
        dnsPolicy: ClusterFirst
        restartPolicy: Always
        schedulerName: default-scheduler
        securityContext: {}
        terminationGracePeriodSeconds: 30
  status:
    availableReplicas: 1
    conditions:
    - lastTransitionTime: "2023-09-03T18:26:51Z"
      lastUpdateTime: "2023-09-03T18:26:51Z"
      message: Deployment has minimum availability.
      reason: MinimumReplicasAvailable
      status: "True"
      type: Available
    - lastTransitionTime: "2023-09-03T18:26:50Z"
      lastUpdateTime: "2023-09-03T18:26:51Z"
      message: ReplicaSet "dotnet-on-docker-c7d448ccd" has successfully progressed.
      reason: NewReplicaSetAvailable
      status: "True"
      type: Progressing
    observedGeneration: 1
    readyReplicas: 1
    replicas: 1
    updatedReplicas: 1
kind: List
metadata:
  resourceVersion: ""

---
apiVersion: v1
items:
- apiVersion: v1
  kind: Service
  metadata:
    annotations:
      cloud.google.com/neg: '{"ingress":true}'
    creationTimestamp: "2023-09-03T18:30:31Z"
    finalizers:
    - service.kubernetes.io/load-balancer-cleanup
    labels:
      app: dotnet-on-docker
    name: dotnet-on-docker
    namespace: default
    resourceVersion: "734092"
    uid: eb71fa7d-cf5f-4c03-b14b-819378914dc6
  spec:
    allocateLoadBalancerNodePorts: true
    clusterIP: 10.60.11.87
    clusterIPs:
    - 10.60.11.87
    externalTrafficPolicy: Cluster
    internalTrafficPolicy: Cluster
    ipFamilies:
    - IPv4
    ipFamilyPolicy: SingleStack
    ports:
    - nodePort: 30329
      port: 80
      protocol: TCP
      targetPort: 80
    selector:
      app: dotnet-on-docker
    sessionAffinity: None
    type: LoadBalancer
  status:
    loadBalancer: {}
- apiVersion: v1
  kind: Service
  metadata:
    creationTimestamp: "2023-09-02T16:19:11Z"
    labels:
      component: apiserver
      provider: kubernetes
    name: kubernetes
    namespace: default
    resourceVersion: "192"
    uid: 45676bb2-6804-4c23-a872-eaafd61d299a
  spec:
    clusterIP: 10.60.0.1
    clusterIPs:
    - 10.60.0.1
    internalTrafficPolicy: Cluster
    ipFamilies:
    - IPv4
    ipFamilyPolicy: SingleStack
    ports:
    - name: https
      port: 443
      protocol: TCP
      targetPort: 443
    sessionAffinity: None
    type: ClusterIP
  status:
    loadBalancer: {}
kind: List
metadata:
  resourceVersion: ""
Note that the service YAML is below the deployment YAML (below the ‘—‘ separator). The main things to note on the YAML file are as follows:
- There is only one deployment and one service that exposes it denoted by v1
- The field ‘kind’ denotes what kind of resource we are creating / managing
- Field ‘spec’ details the specification of the resources. For example for deployment, it describes the replica set or the desired state, type of deployment strategy (RollingUpdate) and container specs (including the image details). Similarly, specs field describes various aspects of the service for the services YAML.
- The ‘selector’ field that shows the tag that ties the deployments and service to the pods.
Lets clear out the existing pods in the cluster to test our deployment YAML. Execute below command and verify that no resources exist –
deepeshjoseph@cloudshell:~$ kubectl delete all -l app=dotnet-on-docker
pod "dotnet-on-docker-c7d448ccd-scnnn" deleted
service "dotnet-on-docker" deleted
deployment.apps "dotnet-on-docker" deleted
deepeshjoseph@cloudshell:~$ ^C
deepeshjoseph@cloudshell:~$ kubectl get all
NAME                 TYPE        CLUSTER-IP   EXTERNAL-IP   PORT(S)   AGE
service/kubernetes   ClusterIP   10.60.0.1    <none>        443/TCP   26h
deepeshjoseph@cloudshell:~$
Now, we are going to set up our deployment yaml file with a specific workload management goal in mind. We will see how easy is to set up such a goal w.r.t to your unique situation. Ok, below is our goal –
- Create a deployment V1 of V1 of the application with a desired state of 2 pods
- Create a deployment V2 of V2 of the application with a desired state of 3 pods
- Use one service V1 to serve both traffic in a round robin fashion
Below is the complete YAML file for this Orchestration goal –
apiVersion: apps/v1
kind: Deployment
metadata:
  labels:
    app: dotnet-on-docker
    version: "1"
  name: dotnet-on-docker-v1
  namespace: default
spec:
  progressDeadlineSeconds: 600
  replicas: 2
  revisionHistoryLimit: 10
  selector:
    matchLabels:
      app: dotnet-on-docker
      version: "1"
  strategy:
    rollingUpdate:
      maxSurge: 25%
      maxUnavailable: 25%
    type: RollingUpdate
  template:
    metadata:
      labels:
        app: dotnet-on-docker
        version: "1"
    spec:
      containers:
      - image: djosephdocker/dotnet-on-docker:0.0.1.RELEASE
        imagePullPolicy: IfNotPresent
        name: dotnet-on-docker
      restartPolicy: Always
      terminationGracePeriodSeconds: 30
---
apiVersion: apps/v1
kind: Deployment
metadata:
  labels:
    app: dotnet-on-docker
    version: "2"
  name: dotnet-on-docker-v2
  namespace: default
spec:
  progressDeadlineSeconds: 600
  replicas: 3
  revisionHistoryLimit: 10
  selector:
    matchLabels:
      app: dotnet-on-docker
      version: "2"
  strategy:
    rollingUpdate:
      maxSurge: 25%
      maxUnavailable: 25%
    type: RollingUpdate
  template:
    metadata:
      labels:
        app: dotnet-on-docker
        version: "2"
    spec:
      containers:
      - image: djosephdocker/dotnet-on-docker:0.0.2.RELEASE
        imagePullPolicy: IfNotPresent
        name: dotnet-on-docker
      restartPolicy: Always
      terminationGracePeriodSeconds: 30
---
apiVersion: v1
kind: Service
metadata:
  annotations:
    cloud.google.com/neg: '{"ingress":true}'
  finalizers:
    - service.kubernetes.io/load-balancer-cleanup
  labels:
    app: dotnet-on-docker
  name: dotnet-on-docker-service
  namespace: default
spec:
  allocateLoadBalancerNodePorts: true
  externalTrafficPolicy: Cluster
  internalTrafficPolicy: Cluster
  ipFamilies:
    - IPv4
  ipFamilyPolicy: SingleStack
  ports:
    - nodePort: 30329
      port: 80
      protocol: TCP
      targetPort: 80
  selector:
    app: dotnet-on-docker
  sessionAffinity: None
  type: LoadBalancer
Note, that the Version of app and deployment blocks are changed, replica information is modified to 2 and 3 respectively. Also, any unwanted field information such nulls and timestamps are removed. Now it’s time to run the deployment yaml via below command and see the results –
C:\Users\deepe\source\repos\DotNetCoreOnDocker\DotNetCoreOnDocker>kubectl get all
NAME                 TYPE        CLUSTER-IP   EXTERNAL-IP   PORT(S)   AGE
service/kubernetes   ClusterIP   10.60.0.1    <none>        443/TCP   28h

C:\Users\deepe\source\repos\DotNetCoreOnDocker\DotNetCoreOnDocker>kubectl apply -f dep.yaml
deployment.apps/dotnet-on-docker-v1 created
deployment.apps/dotnet-on-docker-v2 created
service/dotnet-on-docker-service created

C:\Users\deepe\source\repos\DotNetCoreOnDocker\DotNetCoreOnDocker>kubectl get all
NAME                                       READY   STATUS    RESTARTS   AGE
pod/dotnet-on-docker-v1-df766dbd5-kmtcv    1/1     Running   0          18s
pod/dotnet-on-docker-v1-df766dbd5-n62sq    1/1     Running   0          18s
pod/dotnet-on-docker-v2-68786d5c45-2jwn4   1/1     Running   0          18s
pod/dotnet-on-docker-v2-68786d5c45-7d72g   1/1     Running   0          18s
pod/dotnet-on-docker-v2-68786d5c45-rmbk5   1/1     Running   0          18s

NAME                               TYPE           CLUSTER-IP     EXTERNAL-IP   PORT(S)        AGE
service/dotnet-on-docker-service   LoadBalancer   10.60.10.144   <pending>     80:30329/TCP   17s
service/kubernetes                 ClusterIP      10.60.0.1      <none>        443/TCP        28h

NAME                                  READY   UP-TO-DATE   AVAILABLE   AGE
deployment.apps/dotnet-on-docker-v1   2/2     2            2           18s
deployment.apps/dotnet-on-docker-v2   3/3     3            3           18s

NAME                                             DESIRED   CURRENT   READY   AGE
replicaset.apps/dotnet-on-docker-v1-df766dbd5    2         2         2       18s
replicaset.apps/dotnet-on-docker-v2-68786d5c45   3         3         3       18s

C:\Users\deepe\source\repos\DotNetCoreOnDocker\DotNetCoreOnDocker>
First, we check if any resources exist. We see that none exist except the basic kubernetes service in the cluster. Next, we execute the ‘kubectl apply -f dep.yaml’ command which reads the deployment yaml file (full code mentioned above) and creates the two deployments as needed with specific app. versions (v2 and v1), spinning up required pods for each replica set, and finally exposing both deployments via a single service URL that load balances requests to both app versions.
Let’s go to Google Cloud Console and check it out –
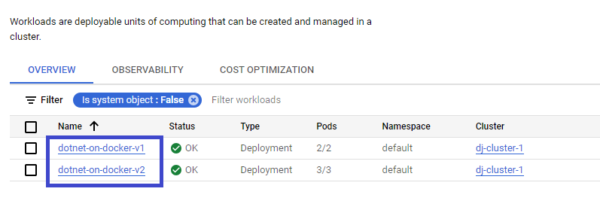
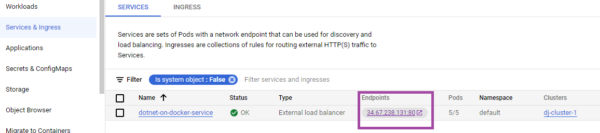
You can verify that both deployments were created for v1 and v2 and below service URL exposes both the deployments –
If you may browse to the app. via the URL, and refresh it for a few times, you will see that Kubernetes effortlessly balances it across the two app. versions!
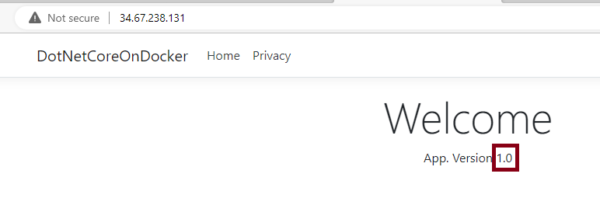
Try 1
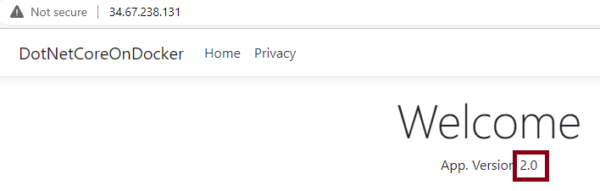
Try 2
Through this simple tutorial you learned the basics of Kubernetes architectural components and also how to deploy and manage your workloads over a leading Cloud provider via hands on exercises. We were basing our examples on .NetCore app, but really the scenarios can be extended to any application that you might have in your container image repository.
Note: Remember to delete all resources that you created to avoid any charges incurred. Issue below command and delete the cluster as needed –
C:\Users\deepe\source\repos\DotNetCoreOnDocker\DotNetCoreOnDocker>kubectl delete all -l app=dotnet-on-docker
pod “dotnet-on-docker-v1-df766dbd5-kmtcv” deleted
pod “dotnet-on-docker-v1-df766dbd5-n62sq” deleted
pod “dotnet-on-docker-v2-68786d5c45-2jwn4” deleted
pod “dotnet-on-docker-v2-68786d5c45-7d72g” deleted
pod “dotnet-on-docker-v2-68786d5c45-rmbk5” deleted
service “dotnet-on-docker-service” deleted
deployment.apps “dotnet-on-docker-v1” deleted
deployment.apps “dotnet-on-docker-v2” deleted
C:\Users\deepe\source\repos\DotNetCoreOnDocker\DotNetCoreOnDocker>kubectl get all
NAME TYPE CLUSTER-IP EXTERNAL-IP PORT(S) AGE
service/kubernetes ClusterIP 10.60.0.1 443/TCP 28h
Strategic Alliances – Review and Case Study
